d’Intérieur is a desktop app for interior designers to manage their contacts and projects efficiently. If you can type fast, d’Intérieur can get your contact management tasks done faster than traditional GUI apps.
If you utilize other online applications for interior designing and lack a centralized, robust, and efficient customer management tool, this application will be able to meet your needs. Designed with modern, tech-savvy interior designers in mind, the app is minimalistic, practical, and greatly rewards users with basic computer proficiency, such as quick typing speed and general know-how.
In this user guide, we will walk you through the basic features and commands of the application, so that you can quickly get started and make full of use of what the application has to offer.
Table of Contents
- Quick start
-
Features
- Command format
- The UI
-
Updating Contacts
- Adding a contact
- Editing a contact
- Deleting a contact
- Creating a tag
- Assigning a tag to a contact
- Unassigning a tag from a contact
- Deleting a tag
- Adding favourites
- Adding high importance flag
- Adding deadlines to meet in relation to a contact
- Deleting a deadline from a contact
- Adding additional notes to a contact
- Deleting notes from a contact
- Adding images
- List contact’s images
- Deleting images
- Clearing all entries
- Navigating your contact list
- Saving the data
- Editing the data file
- Cycling through input history
- Archiving data files
- FAQ
- Command summary
Quick start
-
Ensure you have Java
11or above installed in your Computer. -
Download the latest
dinterieur.jarfrom here. -
Copy the file to the folder you want to use as the home folder for your d’Intérieur.
-
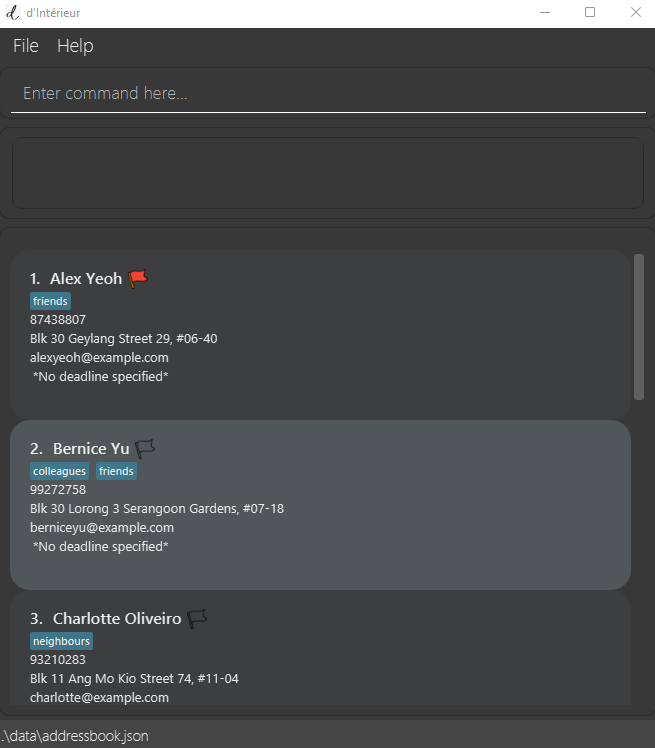
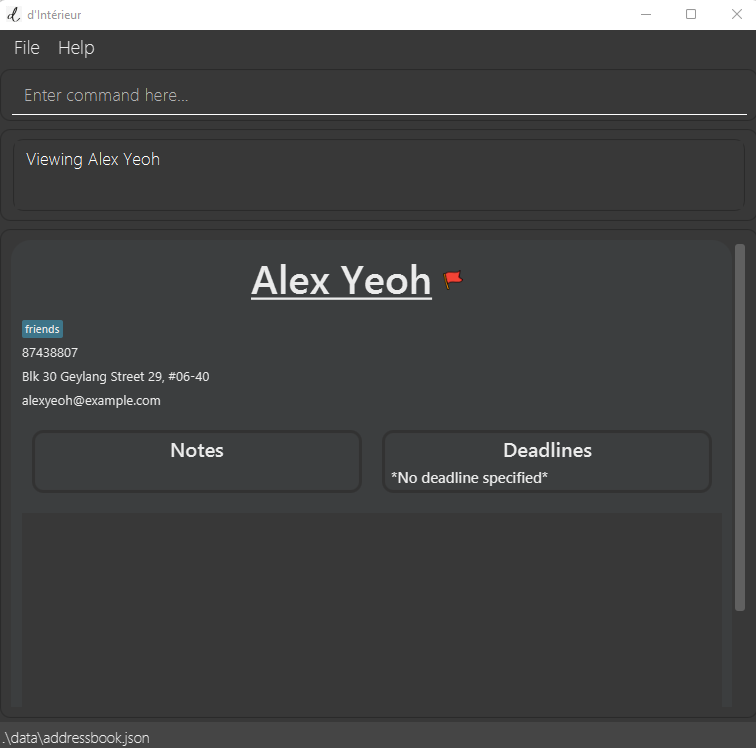
Double-click the file to start the app. The GUI similar to the below should appear in a few seconds. Note how the app contains some sample data.
-
Type the command in the command box and press Enter to execute it. e.g. typing
helpand pressing Enter will open the help window.
Some example commands you can try:-
list: Lists all contacts. -
add n/Mary Jane p/12345678 e/maryJ@example.com: Adds a contact named Mary Jane to the Address Book. -
delete3: Deletes the 3rd contact shown in the current list. -
fav2: Adds the 2nd contact shown in the current list to your list of favourite contacts -
view2: Brings the 2nd contact into detailed view. -
exit: Exits the app.
-
-
Refer to the Features below for details of each command.
Tutorial
- This is the list view, the primary view you will work with when using the app.

-
In list view, all commands requiring an
INDEXwill reference the index provided on the left side of the contact’s name. For example, typing the commandfav 2will favourite the 2nd contact in the list.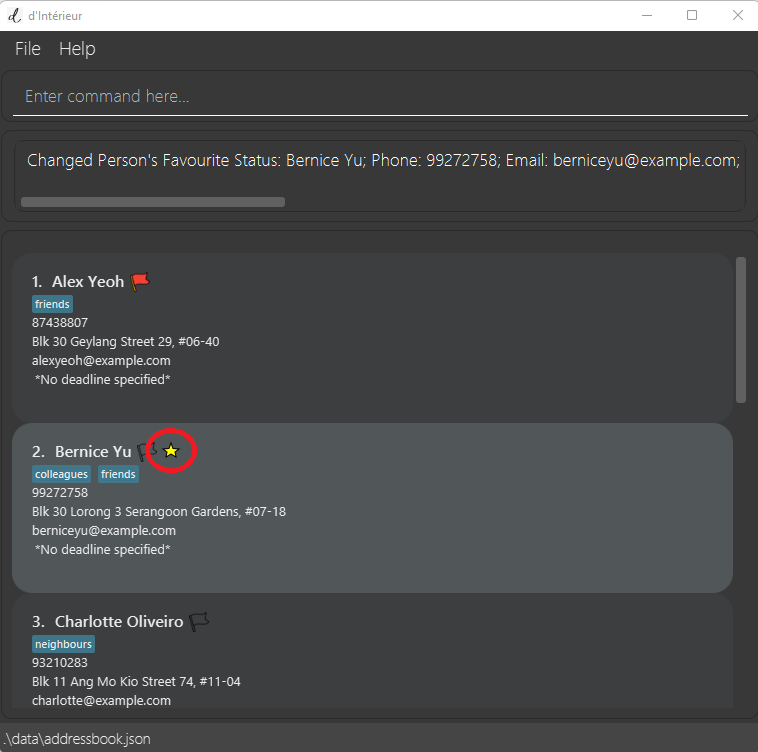
-
Add a new contact by running
add n/<YOUR NAME> p/<YOUR PHONE NUMBER> e/<YOUR EMAIL ADDRESS>. These fields are mandatory when creating a new contact. However, you can add more optional information in the same add command, or in a future edit command. See adding a contact and editing a contact for more information.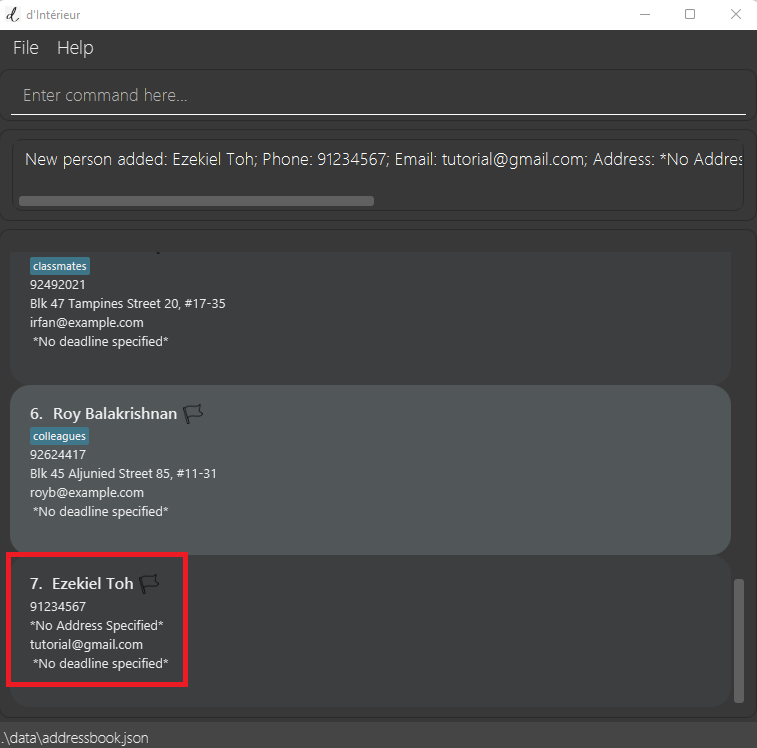
-
To bring the second contact into detailed view, input
view 2.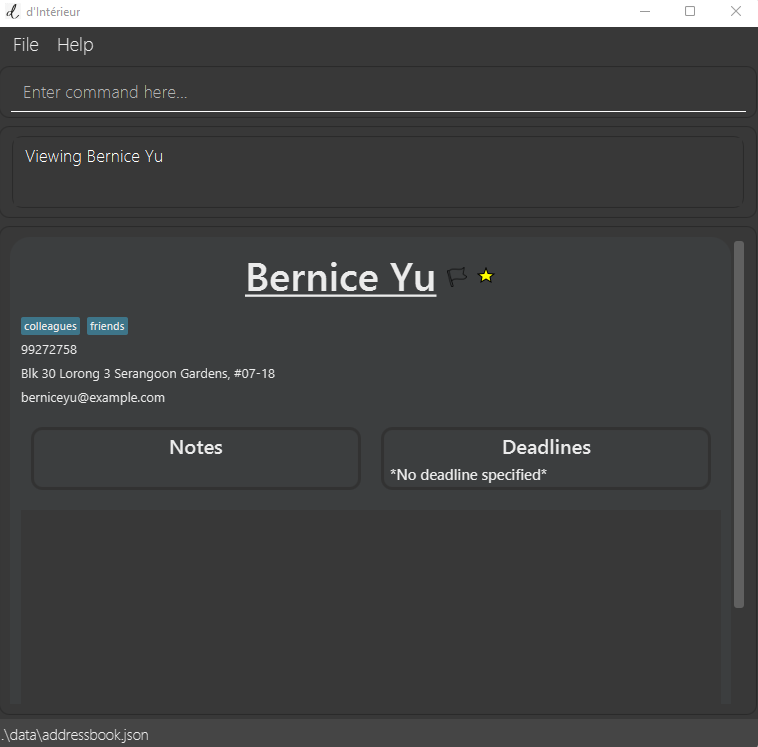
-
In detailed view, some commands available to you in list view are no longer available, however, your commands will now automatically reference the current contact you are viewing in detailed view. For example, you can type
imptto simply label the current contact you are viewing to set them as an important contact.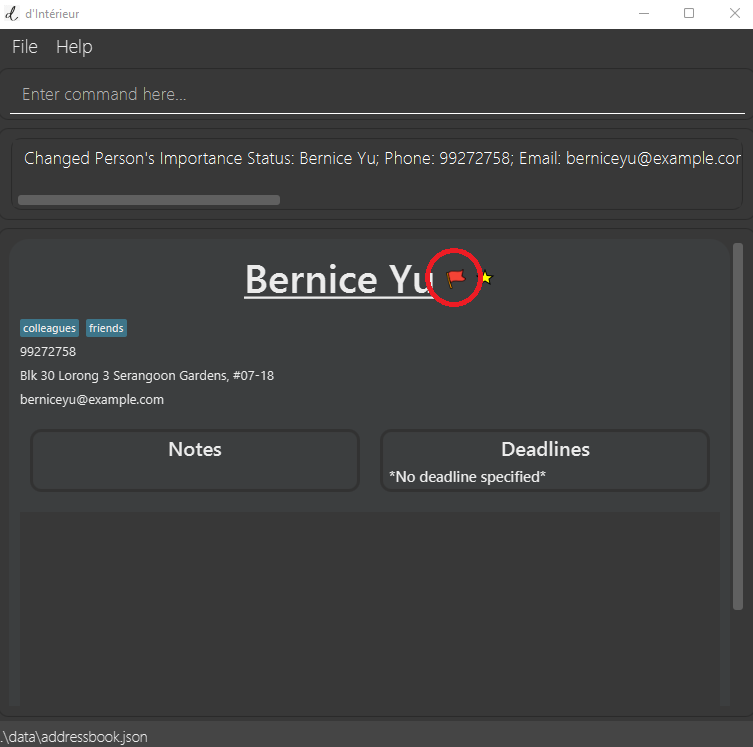
- To exit detailed view, simply input
listto return to the list view.
These are just the basic features to get you ready to start using the app. There are many more features for you to
explore, it is recommended for you to have a read through our User Guide to familiarize yourself with the functionalities
of the app. You can always input the help command whenever you need help or want to reference the User Guide again!
Features
Command Format
Before going into the commands, take note of how the command format is given in the guide:
-
Words in
UPPER_CASEare the values that you will enter in the command.
e.g. inadd n/NAME,NAMEis a parameter which can be used asadd n/Mary Jane. -
Items in square brackets are optional.
e.gn/NAME [t/TAG]can be used asn/Mary Jane t/friendor asn/Mary Jane. -
Items with
… after them can be used multiple times including zero times.
e.g.[t/TAG]…can be used ast/friend,t/friend t/familyetc. -
Values can be given in any order.
e.g. if the command specifiesn/NAME p/PHONE_NUMBER,p/PHONE_NUMBER n/NAMEis also acceptable. -
If a type of value is expected only once in the command but you specified it multiple times, only the last occurrence of the type will be taken.
e.g. if you specifyp/12341234 p/56785678, onlyp/56785678will be taken. -
Extraneous values for commands that do not take in values (such as
help,list,exitandclear) will be ignored.
e.g. if the command specifieshelp 123, it will be interpreted ashelp.
The UI
The UI consists of the command line to enter your commands, the feedback box which displays textual information about the result of the command execution, and the contact display.
There are 2 main ways to view contacts.
Listing all contacts : list
Shows the list view with all contacts in the address book.
Format: list
Viewing a contact’s full details : view
Allows you to view the full details of the contact, as some are hidden in the contact list. This command only works in list view.
Format view INDEX
Commands in detailed view
Some commands may work differently in the detailed view from in the list view.
In general, commands for modifying a contact will work, and will modify the contact currently displayed. As such, there is no need to give an index for those commands anymore, and they will be ignored if the command is called in this view.
If the command does not work in the current view, the app will inform you. To return to list view, use list.
You may check out the summary table of commands for the overview.
Viewing help : help
Shows a message explaining how to access the help page. You may use this frequently when you first begin using d’Intérieur.
When you’re feeling overwhelmed by the number of commands available, refer to the command summary and the examples!
Format: help

![]() More information about the help window:
More information about the help window:
After you successfully clicked on the Copy URL button, you will see the following window:

You’re now ready to paste the link into your browser!
Exiting the program : exit
Exits the program.
Format: exit
Updating contacts
There is a set of information that you can save for a contact. This section contains the commands for adding contacts and modifying their information.
Adding a contact : add
You can add a contact to the address book with the address as an optional field.
Your contacts are uniquely identified by their NAME which is case-sensitive.
e.g. Alex Yeoh is different from alex yeoh
Format: add n/NAME p/PHONE_NUMBER e/EMAIL [a/ADDRESS] [t/TAG]…
Examples:
add n/John Doe p/98765432 e/johnd@example.comadd n/Mary Jane p/12345678 e/maryJ@example.com a/Bukit Timah t/completed
Editing a contact : edit
Edits an existing contact in the address book. This command can be used in detailed view.
Format: edit INDEX [n/NAME] [p/PHONE] [e/EMAIL] [a/ADDRESS]…
- Edits the contact at the specified
INDEX. The index refers to the index number shown in the displayed contact list. The index must be a positive integer 1, 2, 3, … - At least one of the optional fields must be provided.
- Existing values will be updated to the input values.
Examples:
-
edit 1 p/91234567 e/johndoe@example.comEdits the phone number and email address of the 1st contact to be91234567andjohndoe@example.comrespectively. -
edit 1 n/JohnEdits the name of the 1st contact to beJohn.
Format in detailed view: edit [n/NAME] [p/PHONE] [e/EMAIL] [a/ADDRESS]…
Example:
-
edit p/88438809 e/alex_yeoh@example.comEdits the phone number and email address of the contact in detailed view to be88438809andalex_yeoh@example.comrespectively.
Deleting a contact : delete
Deletes the specified contact from the address book. This command only works in list view.
Format: delete INDEX
- Deletes the contact at the specified
INDEX. - The index refers to the index number shown in the displayed contact list.
- The index must be a positive integer 1, 2, 3, …
Examples:
-
listfollowed bydelete 2deletes the 2nd contact in the address book. -
find Betsyfollowed bydelete 1deletes the 1st contact in the results of thefindcommand.
Creating a tag : tag
Creates a tag that can be assigned to any contact. This command can be used in detailed view with the same format.
Format: tag TAGNAME
- A tag with the same
TAGNAMEcan only be created once. - The
TAGNAMEis case-insensitive. e.g. creating the tagfriendswill not allowFriendsto be created. -
TAGNAMEmust be alphanumeric. e.g.Hello,Friends,Colleagues -
TAGNAMEsuch as-1,Sub Contractorsare not allowed. i.e. non-alphanumeric characters, including spaces. - To create a tag named
Sub Contractors, eliminate the whitespace in between in order for it to be a valid tag. e.g.SubContractors
List of tag related features:
Example:
-
tag Friendscreates a tagFriendsto be stored in the address book.
Assigning a tag to a contact : assign
Assigns a created tag to a contact. This command can be used in detailed view.
Format: assign INDEX TAGNAME
- Assigns a
TAGwith a givenTAGNAMEto a contact at the specifiedINDEX - The
TAGgiven by theTAGNAMEmust be created first. - The
TAGNAMEis case-insensitive. - The index refers to the index number shown in the displayed contact list.
- The index must be a positive integer 1, 2, 3, …
- The contact should have at most one
TAGwith a given uniqueTAGNAME. - The contact assigned to the given
TAGNAMEcannot be assigned to the sameTAGNAMEagain. e.g. assigning the tagfriendsto Alice at index 1 will not allowFriendsto be assigned to the same contact.
Example:
-
assign 1 Friendsassigns a tagFriendsto the contact at index1.-
Before using the command
assign 1 Friends: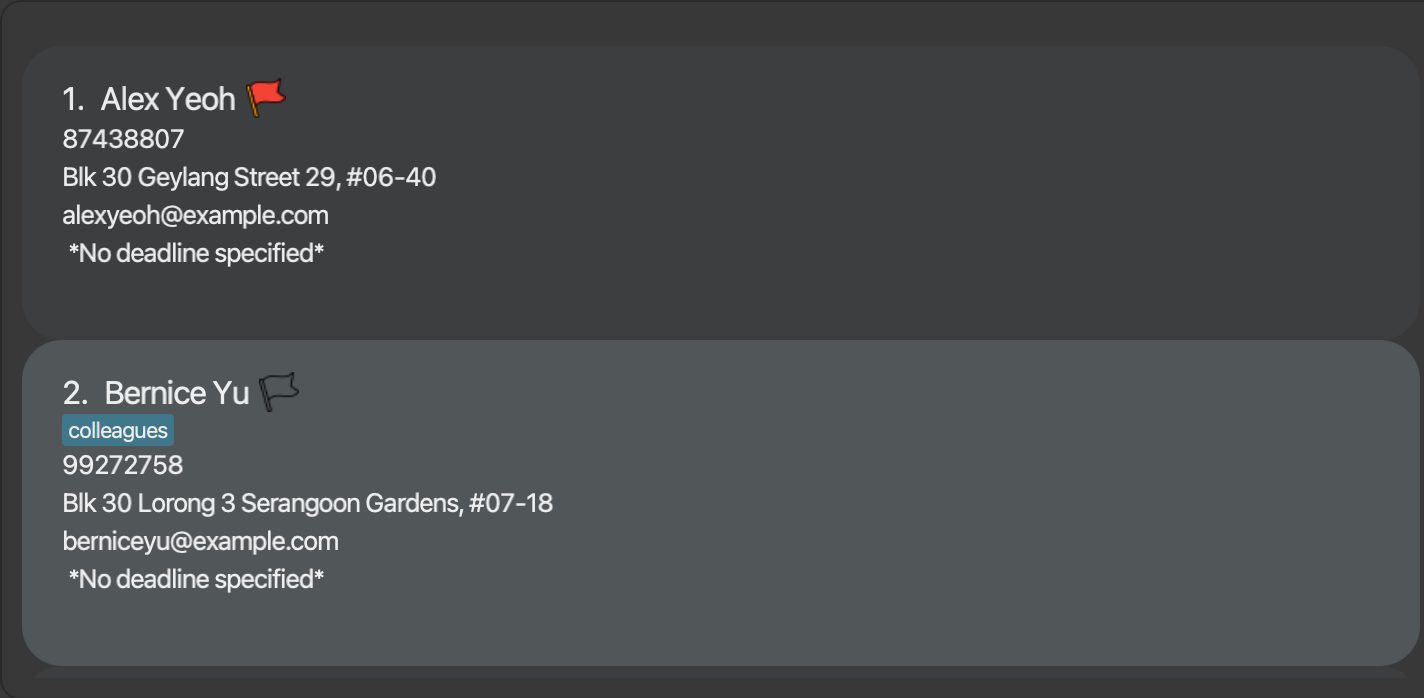
-
assign 1 Friends: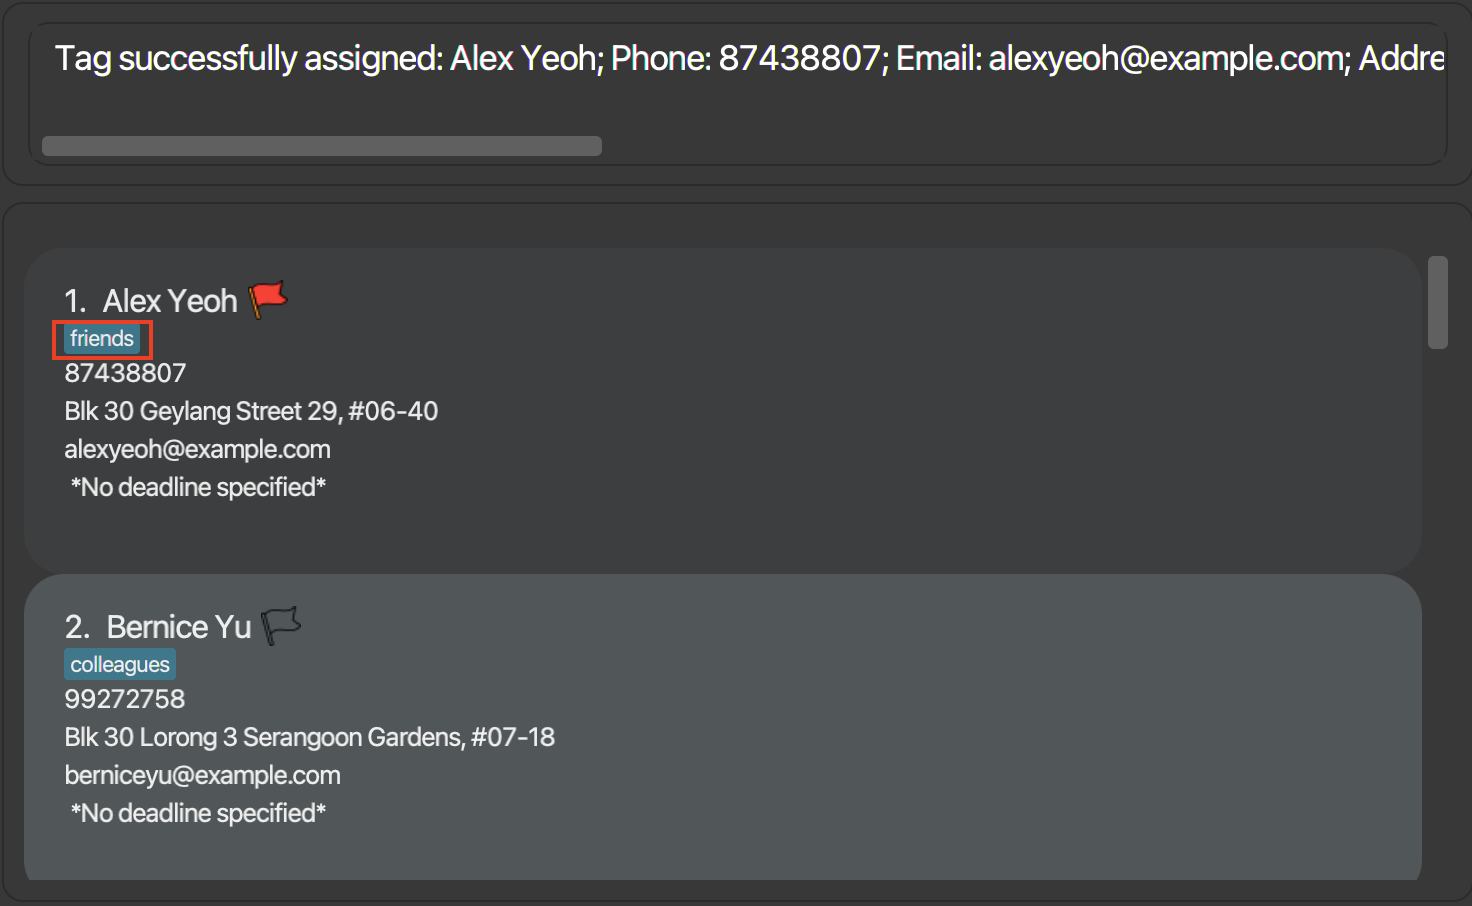
-
-
assign 3 Colleaguesassigns a tagColleaguesto the contact at index3.-
Before using the command
assign 3 Colleagues: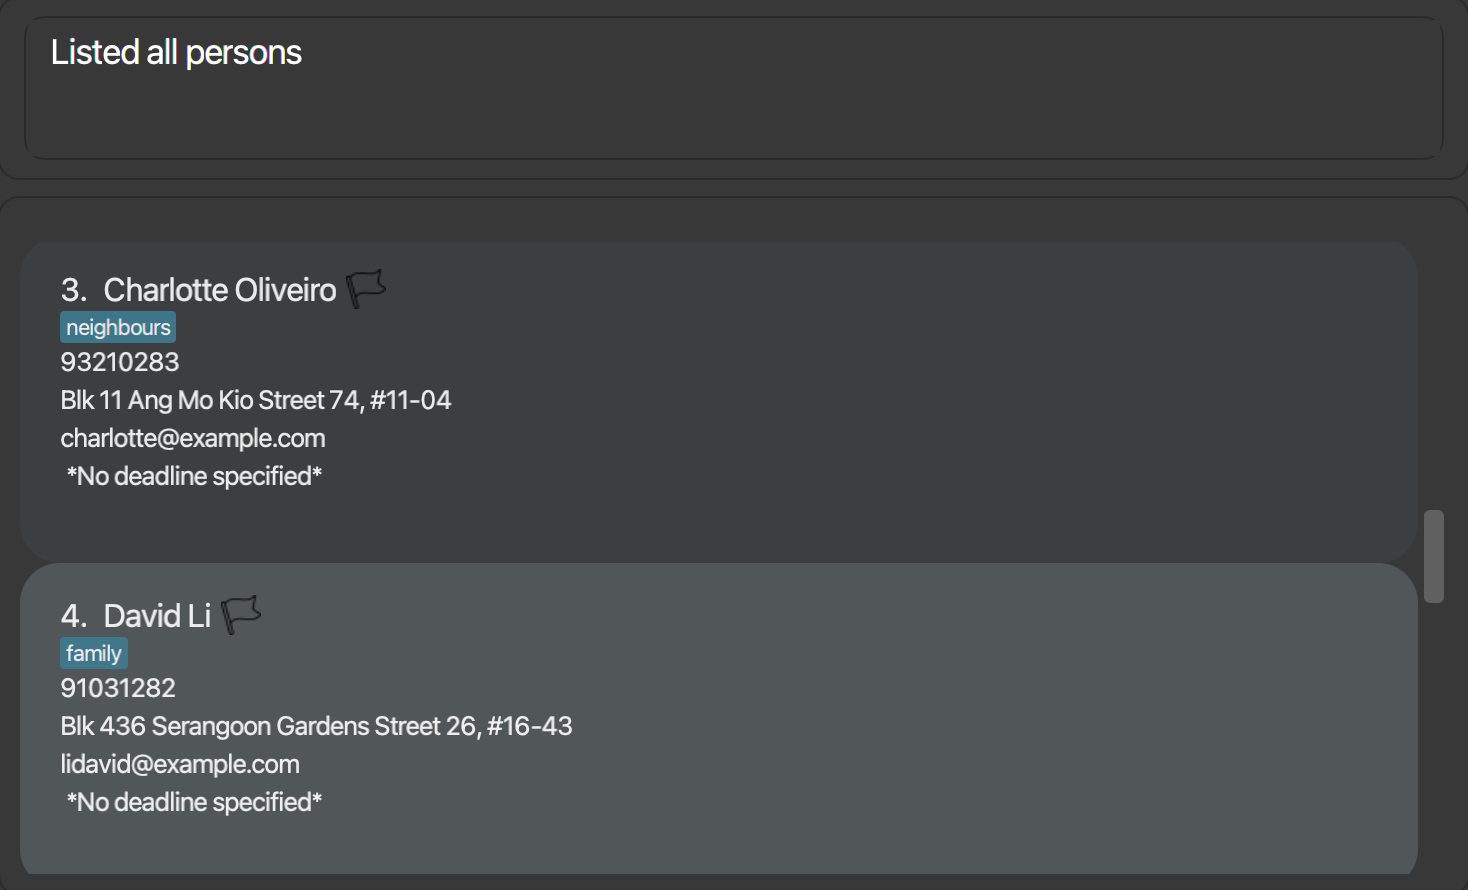
-
assign 3 Colleagues: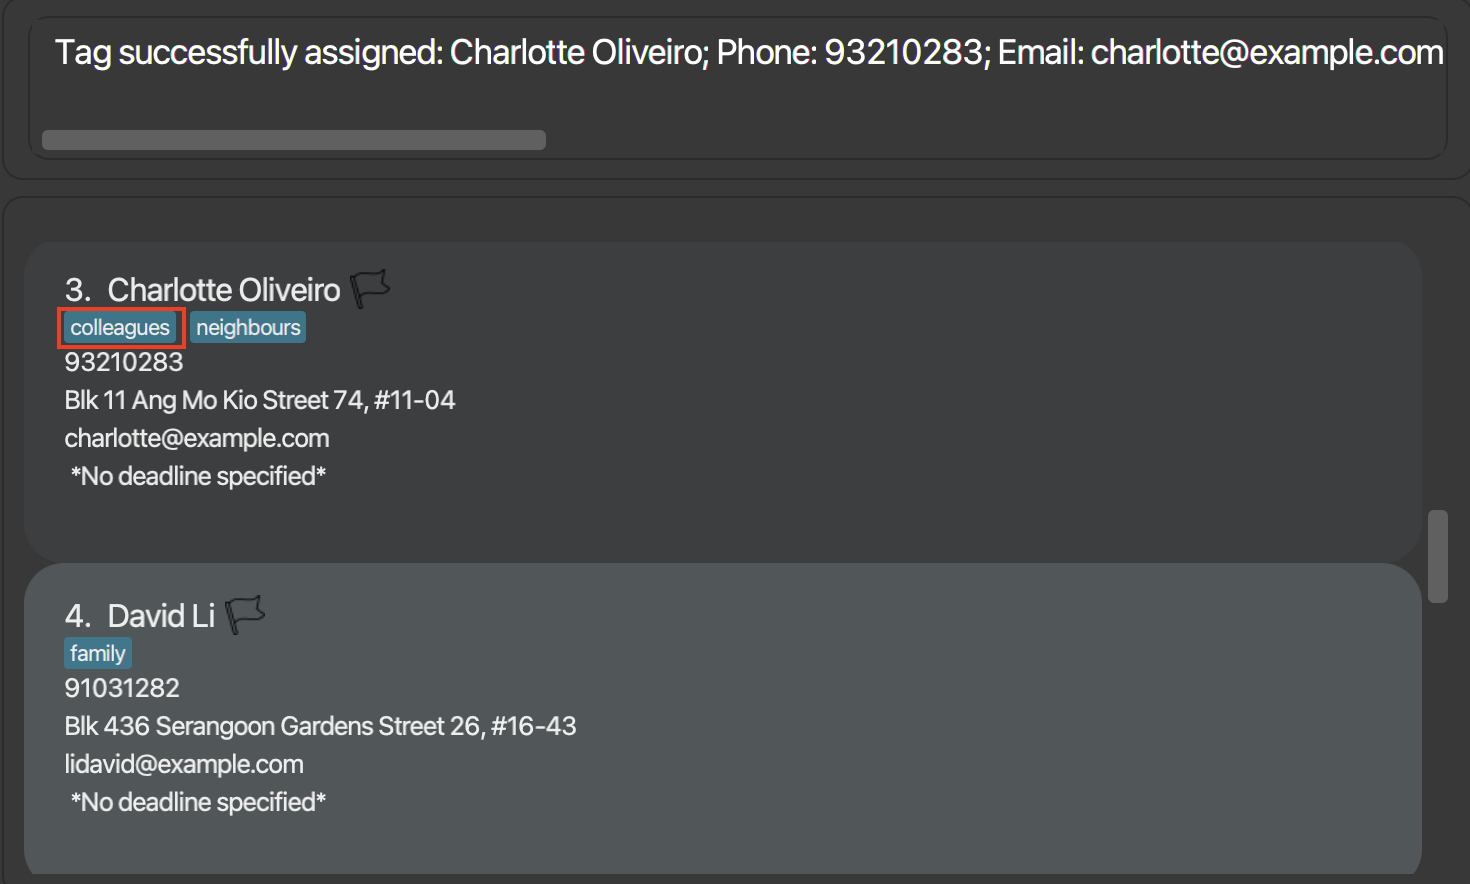
-
Format in detailed view: assign TAGNAME
Example:
-
assign clientassigns a tagclientto the currently viewed contact.-
view 1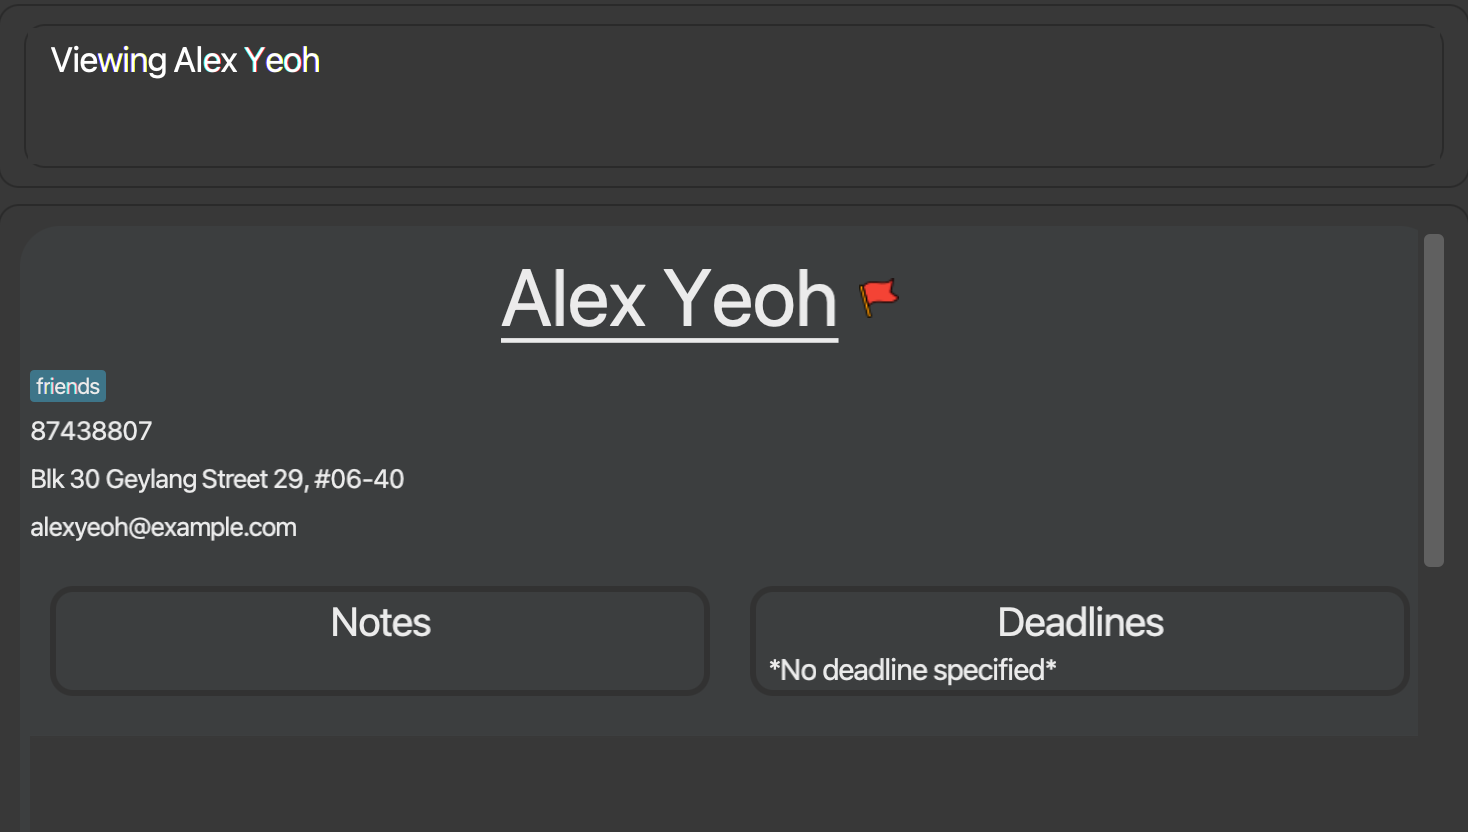
-
assign client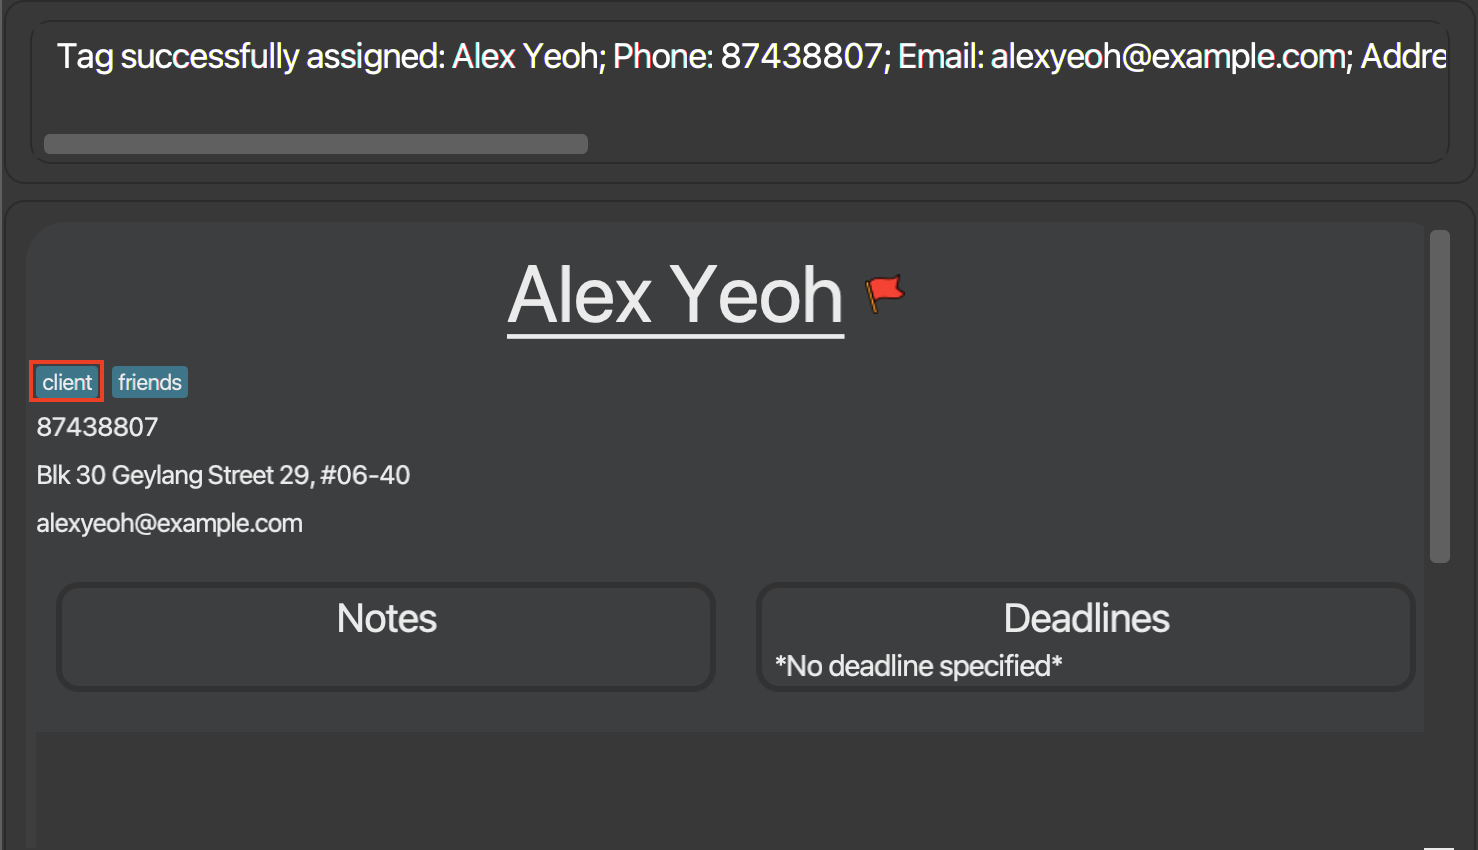
-
Unassigning a tag from a contact : unassign
Unassigns a created tag from a contact. This command can be used in detailed view.
Format: unassign INDEX TAGNAME
- Removes a
TAGwith a givenTAGNAMEfrom a contact at the specifiedINDEX - The
TAGgiven by theTAGNAMEmust be created first. - The
TAGNAMEis case-insensitive. - The index refers to the index number shown in the displayed contact list.
- The index must be a positive integer 1, 2, 3, …
- The contact must have been assigned to this
TAGpreviously.
Example:
-
unassign 1 Friendsremoves the tagFriendsfrom the contact at index1.-
Before using the command
unassign 1 Friends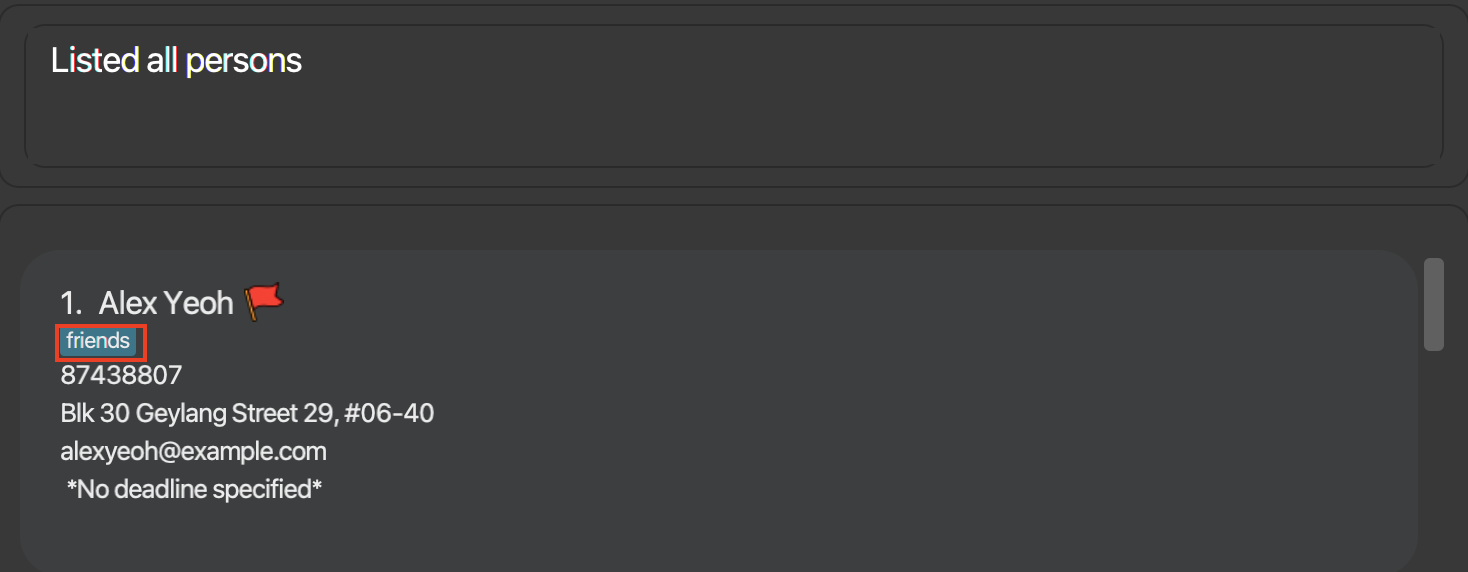
-
unassign 1 Friends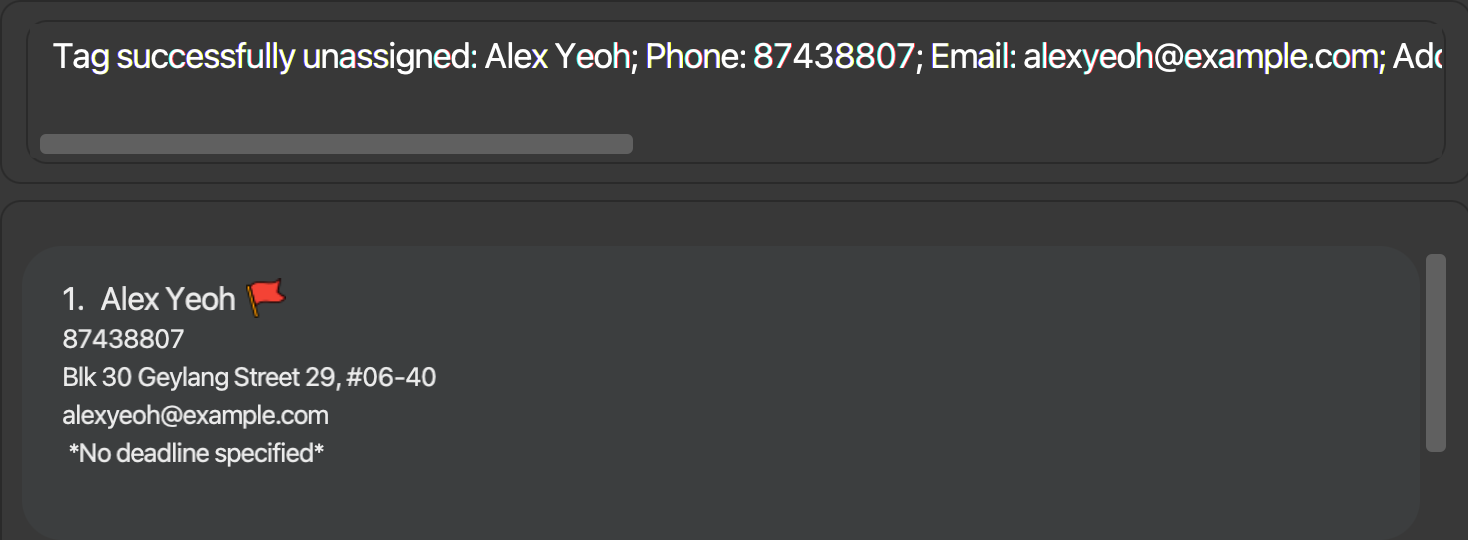
-
Format in detailed view: unassign TAGNAME
Example:
-
unassign clientremoves the tagclientfrom the currently viewed contact.-
view 1
-
unassign client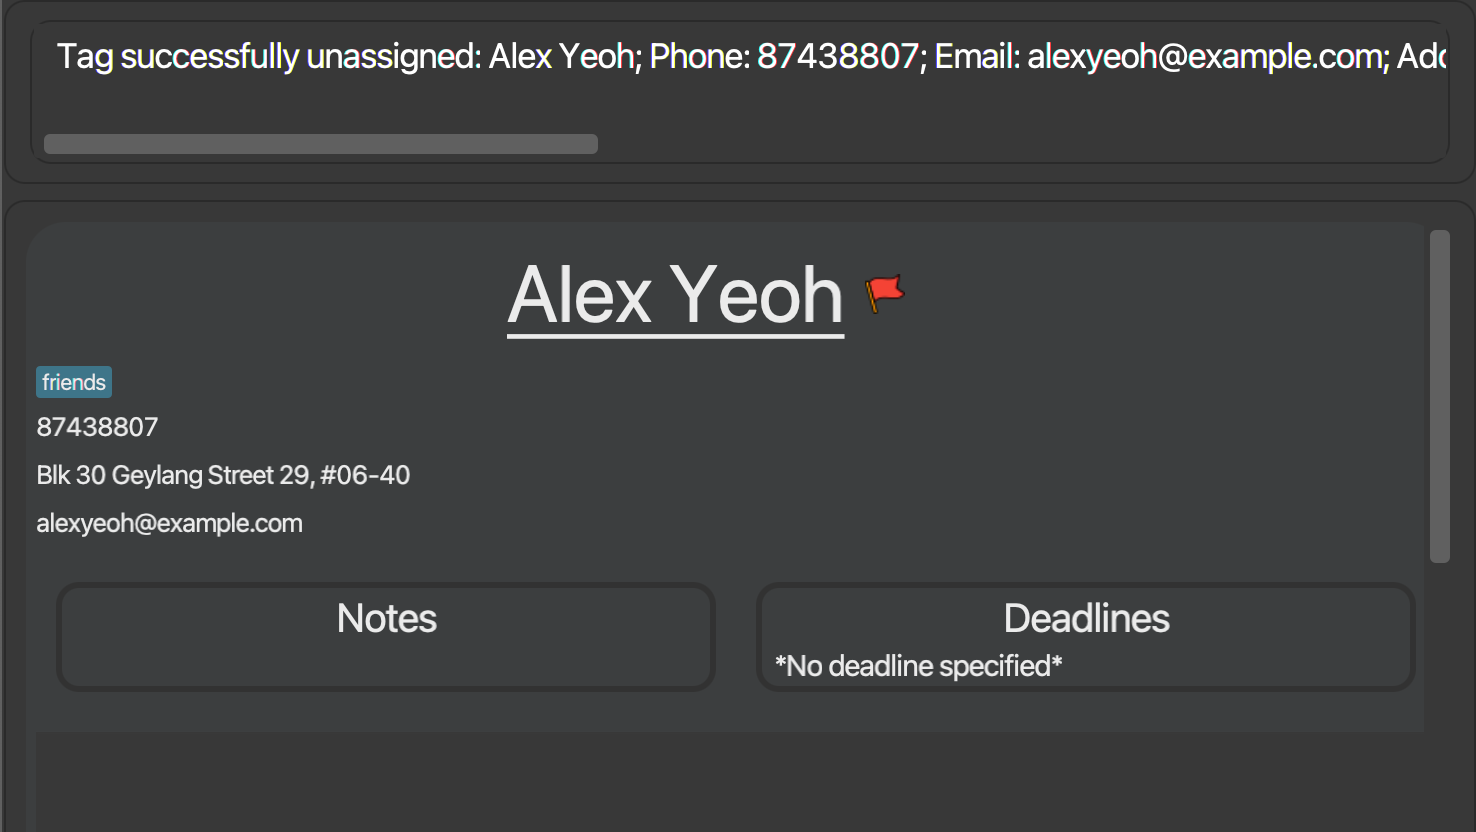
-
Deleting a tag : deltag
Deletes the specified tag(s)
Format: deltag TAGNAME [MORE_TAGNAME]
- Deletes the tag(s) identified by the given
TAGNAME. - Unassigns the deleted tags from all contacts who were previously assigned to the
tagwith givenTAGNAME. - If the multiple
TAGNAMEspecified has more than 1tagthat cannot be identified , the identifiable tag(s) will be deleted.
Examples:
-
deltag friendsdeletes the tagfriends-
Before using the command
deltag friends: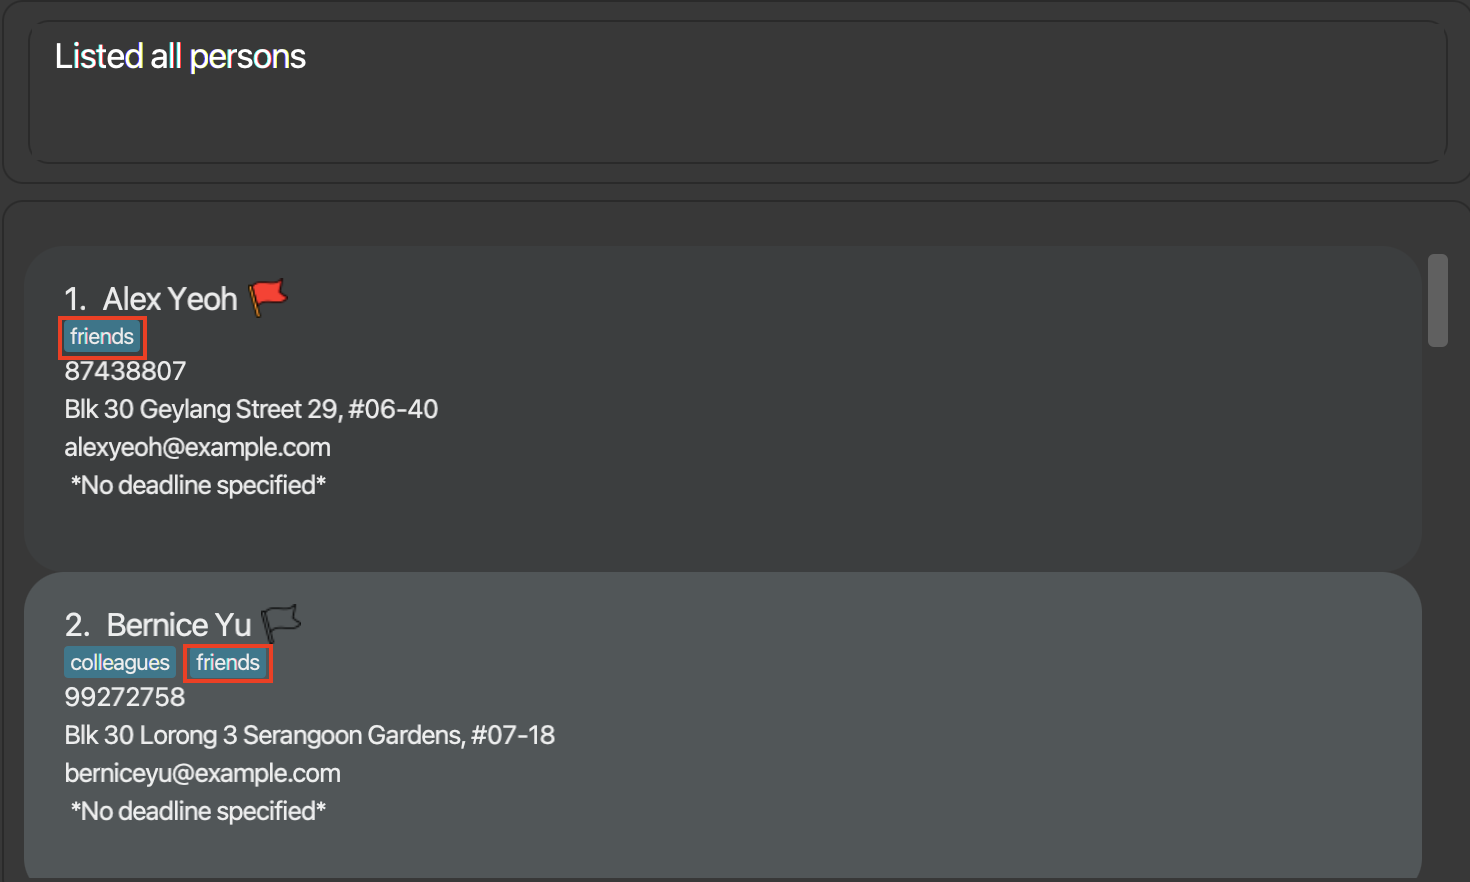
-
deltag Friends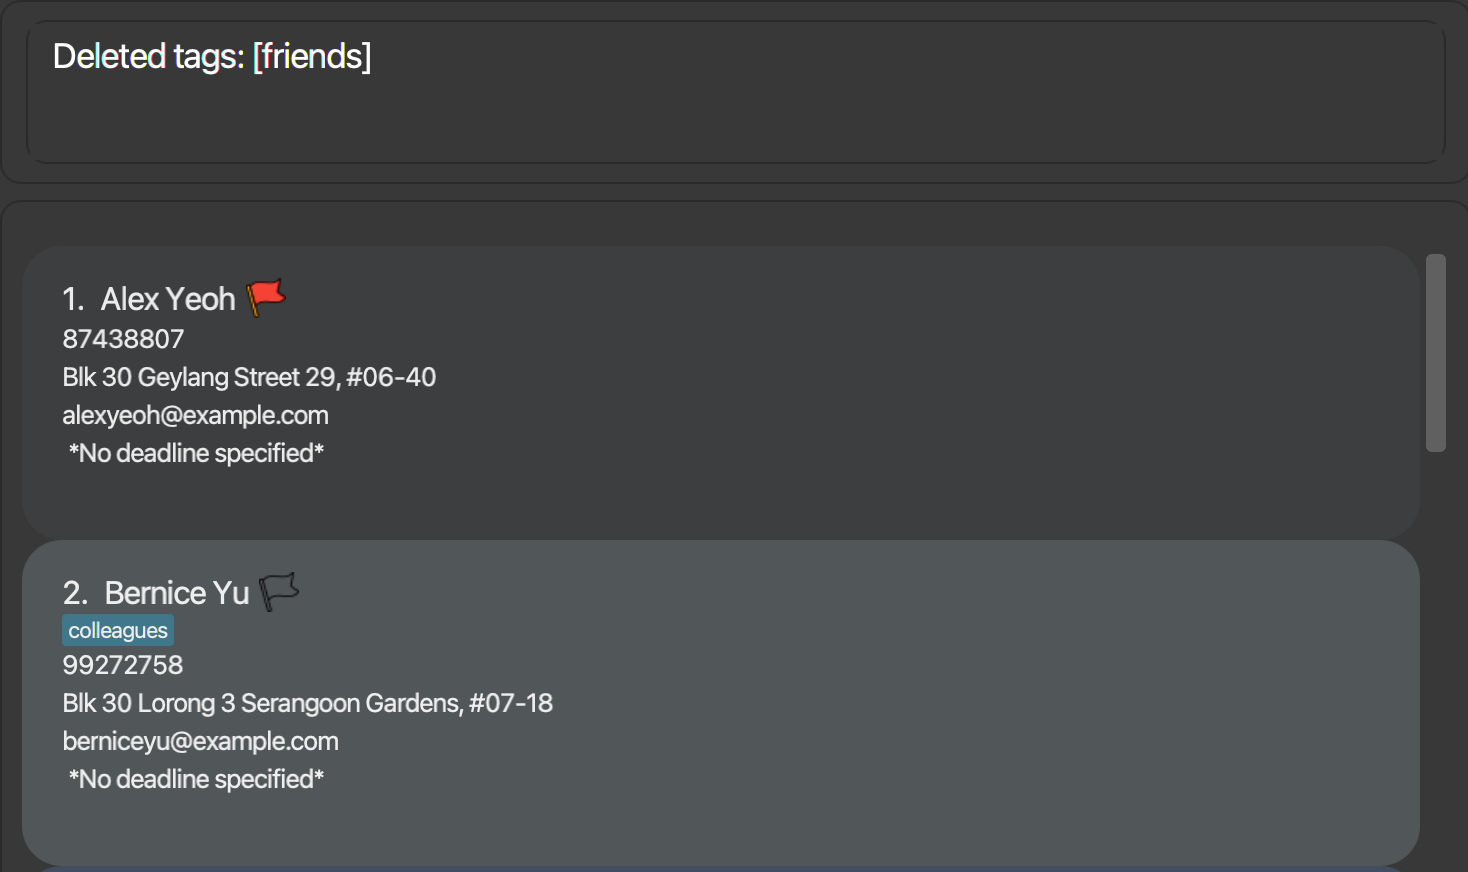
-
-
deltag friends colleaguesdeletes the tagfriendsandcolleagues-
Before using the command
deltag friends colleagues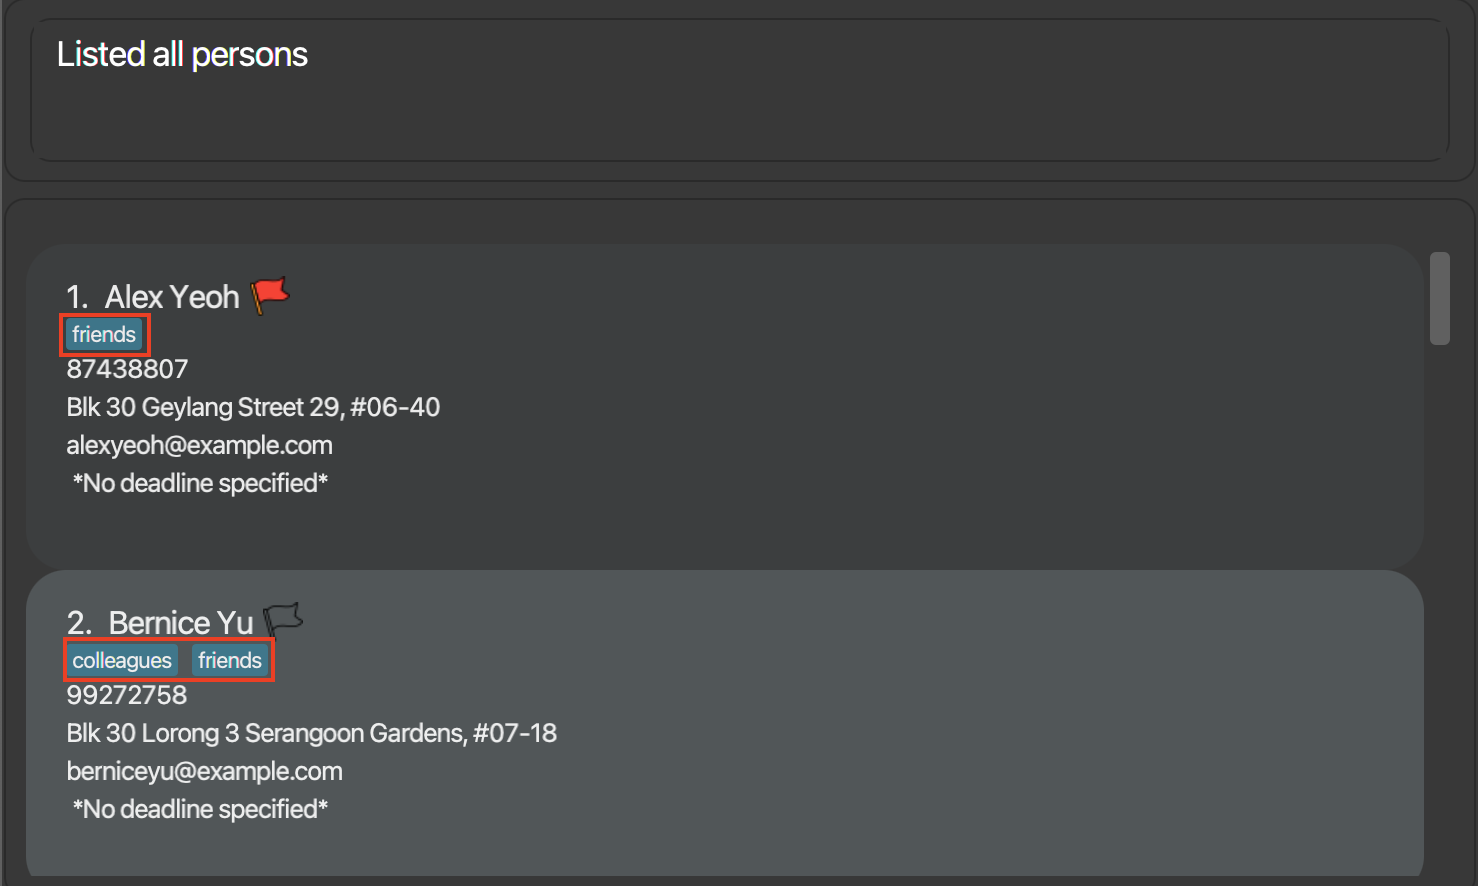
-
deltag friends colleagues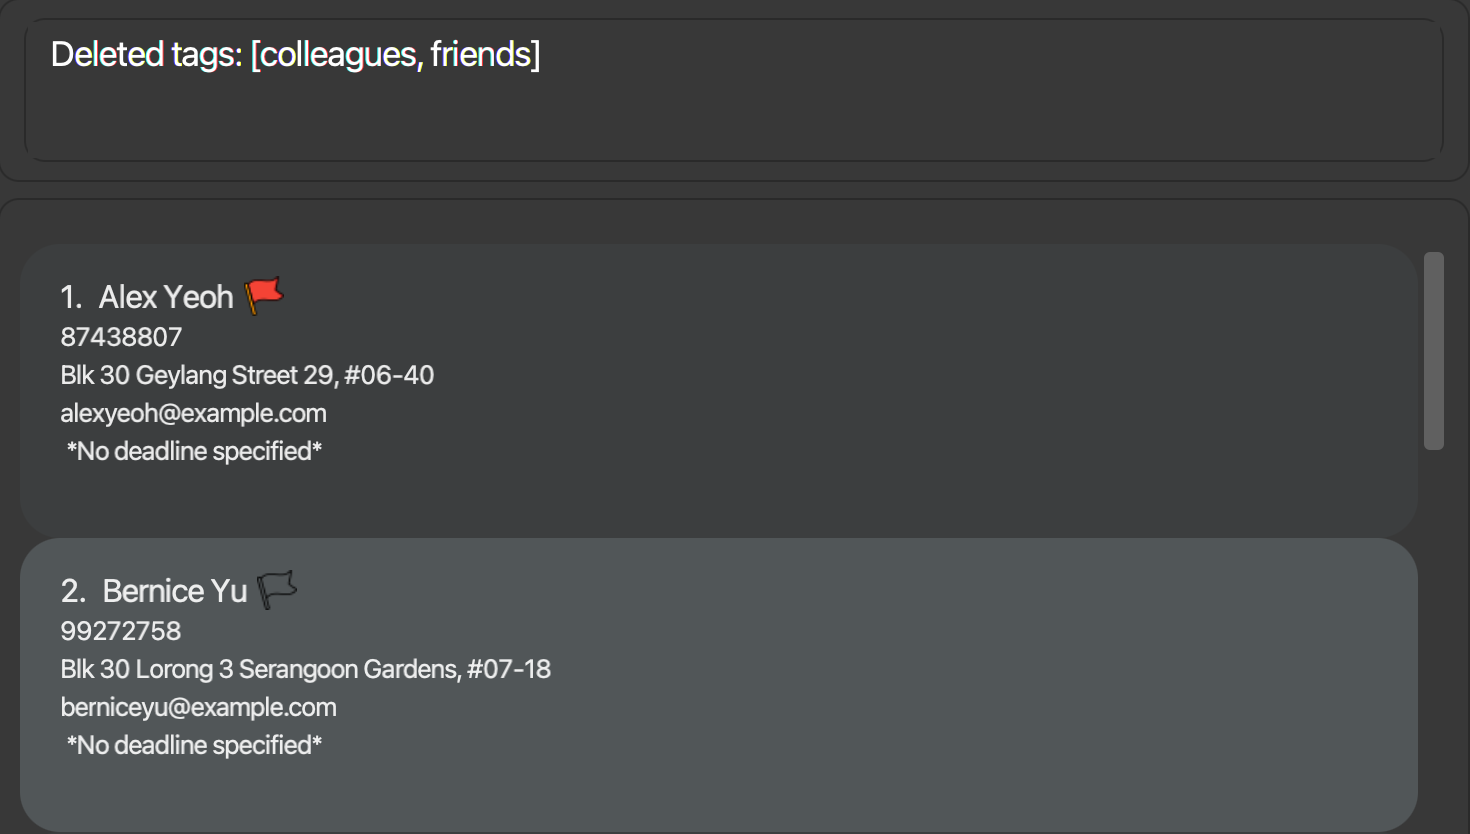
-
-
deltag friends colleagueswhen the tagcolleaguesdoes not exist will delete the tagfriendsand unassign the tagfriendsfrom every contact-
Before using the command
deltag friends colleagues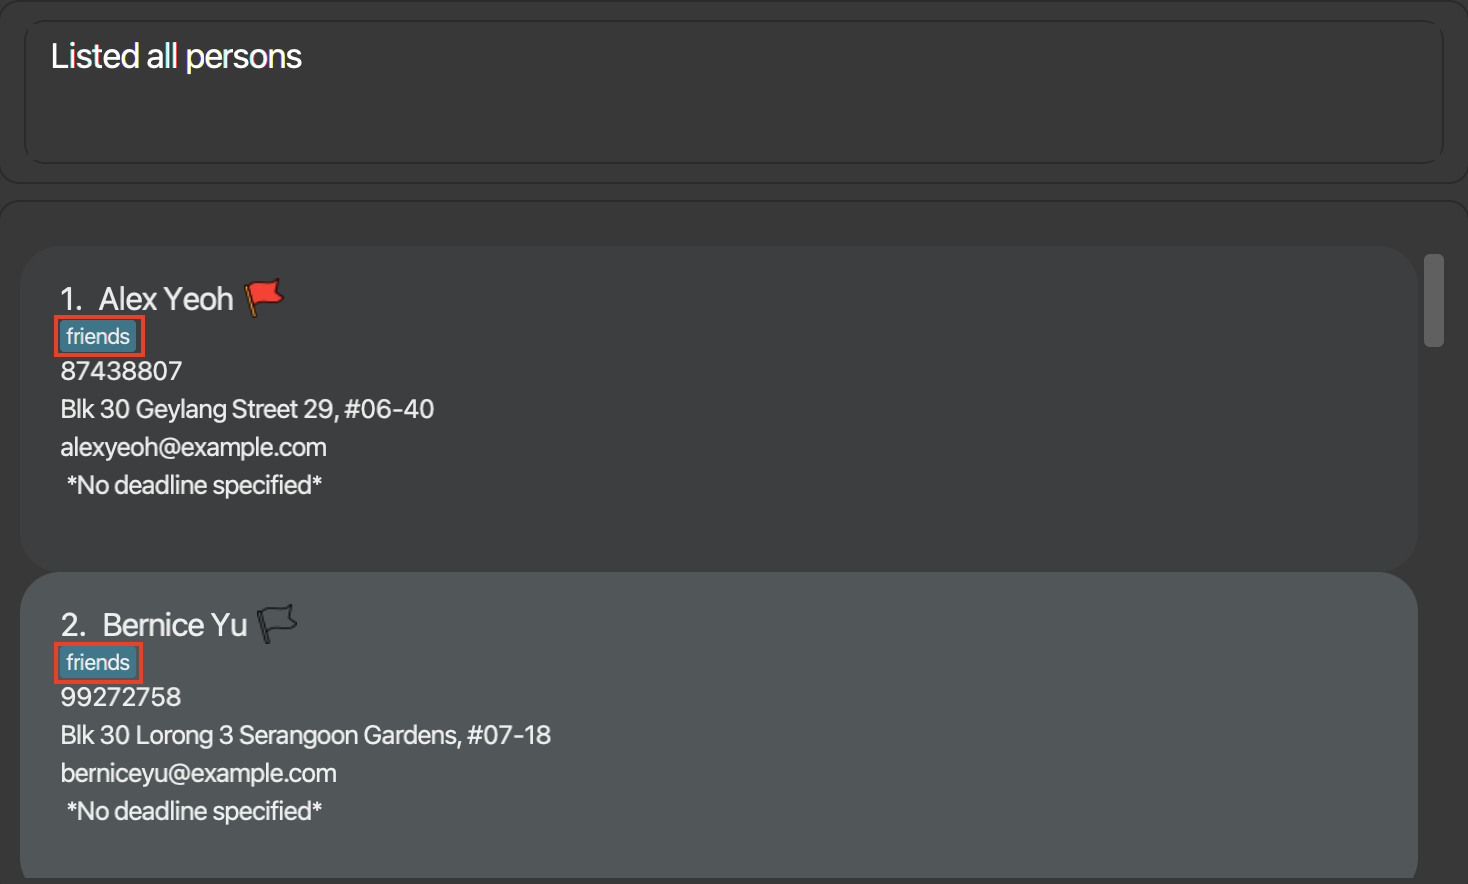
-
deltag friends colleagues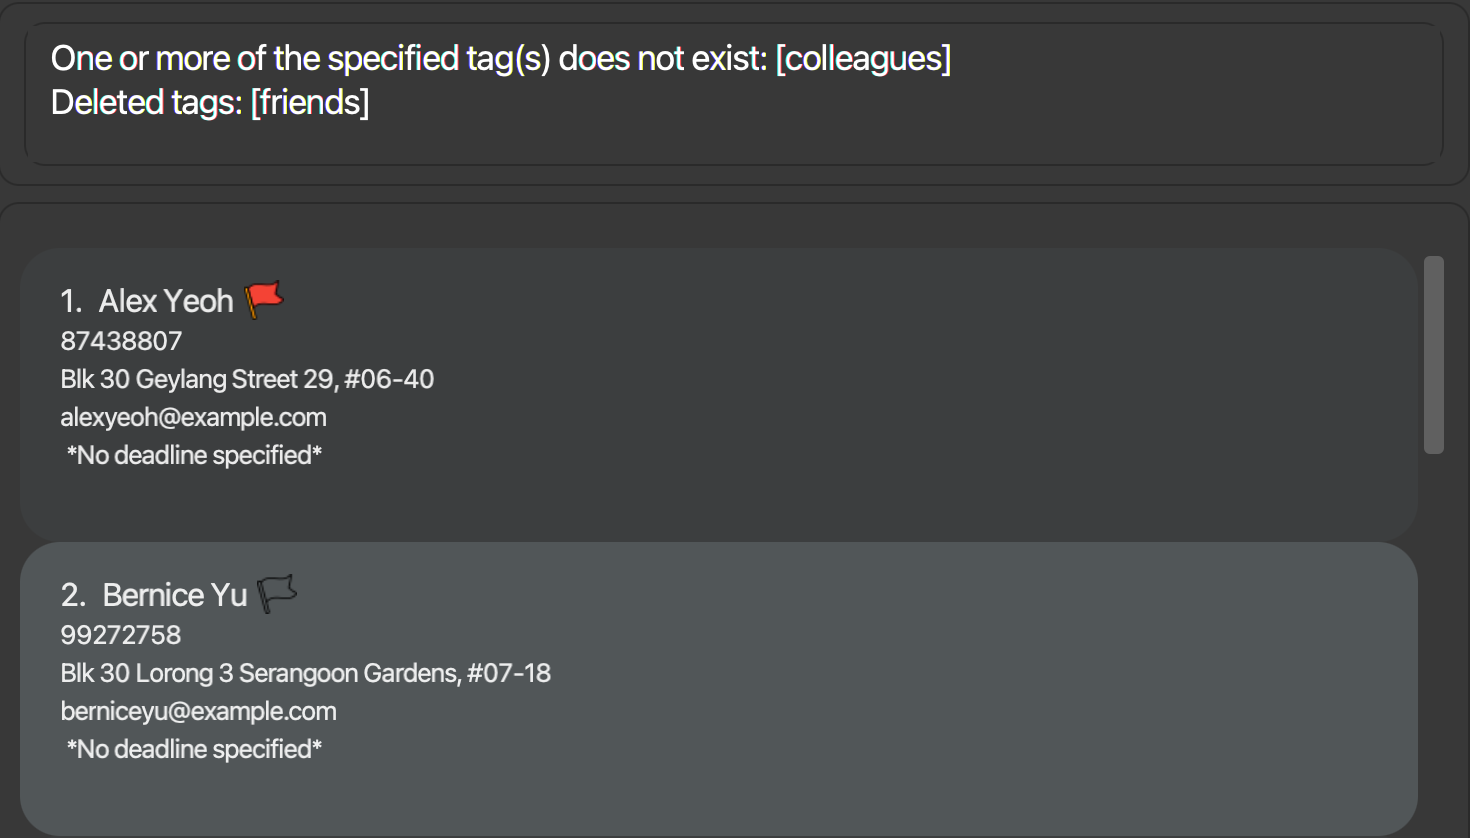
-
-
deltag colleagueswhen the tagcolleaguesdoes not exist will not change the data.
Adding favourites : fav
Toggles the favourite status of your contacts. This command can be used in detailed view. Favourited contacts can be un-favourited by running the same command on the contact again.
Format: fav INDEX
fav INDEX where INDEX is the index of a contact that currently belongs in your favourites list to remove them.
Examples:
-
fav 1— Adds contact at index 1 to your list of favourites
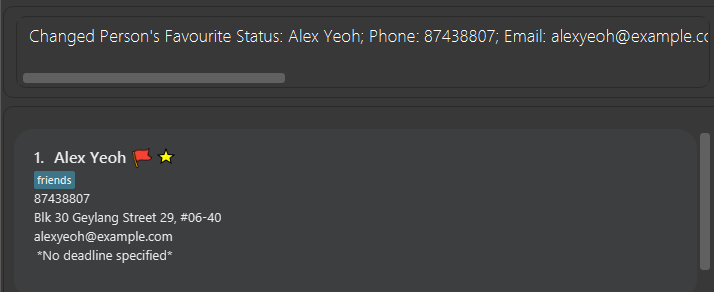
-
fav 1- Run the command for the same contact, and the favourite status will be toggled off.
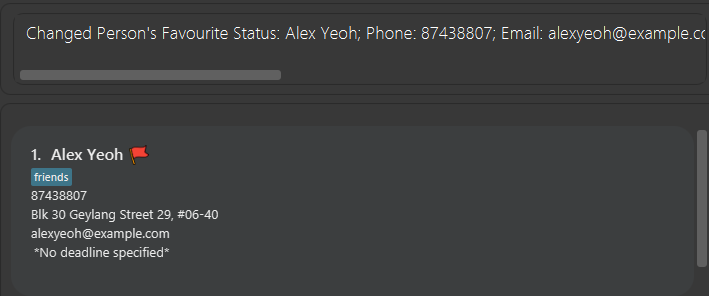
Format in detailed view: fav
Example:
-
favAdds the currently viewed contact to your list of favourites.
Adding high importance flag : impt
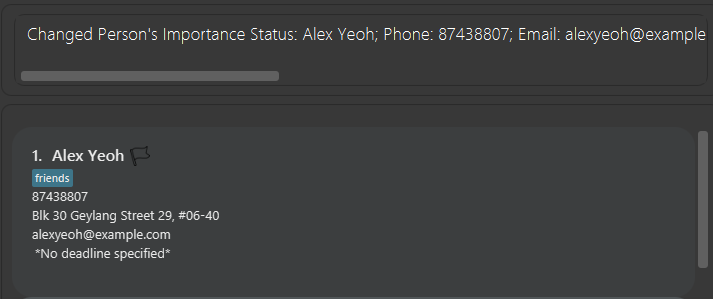
Adds the contact to your list of contacts with high importance and a red flag will appear beside the contact’s name to indicate that. This command can be used in detailed view.
Format: impt INDEX
impt INDEX again where INDEX is the index of a contact that currently belongs in your list of contacts with high importance to remove them.
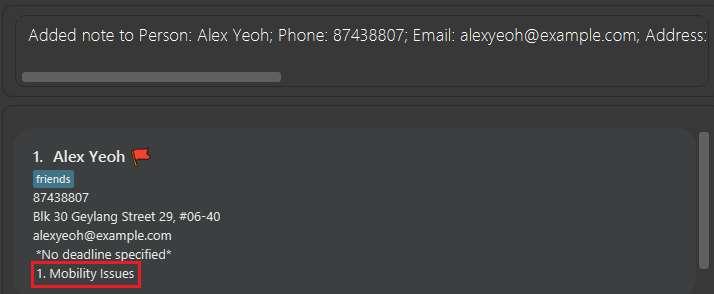
note command to add a note to indicate why the contact is important. E.g. Mobility Issues.
Examples:
-
impt 1- Adds contact at index 1 to your list of contacts with high importance, indicated by the red flag
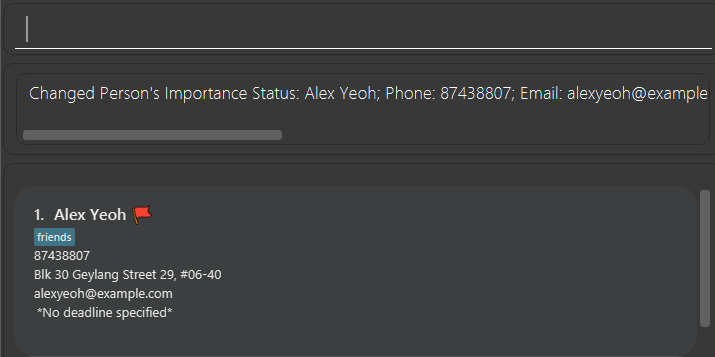
You will remove the red flag beside the contact’s name after entering impt 1 again.
note 1 r/Mobility Issues - Adds a note for your contact at index 1 indicating he/she has mobility issues
Format in detailed view: impt
Example:
-
imptAdds the currently viewed contact to your list of contacts with high importance.
Adding deadlines to meet in relation to a contact : deadline
Creates a deadline that is placed under the profile of a contact. This command can be used in detailed view.
Format: deadline INDEX d/DESCRIPTION DATE [d/DESCRIPTION DATE]...
- Deadline must have description.
- The given date is added to the contact as deadline.
- Date should be dd/mm/yyyy
Example:
-
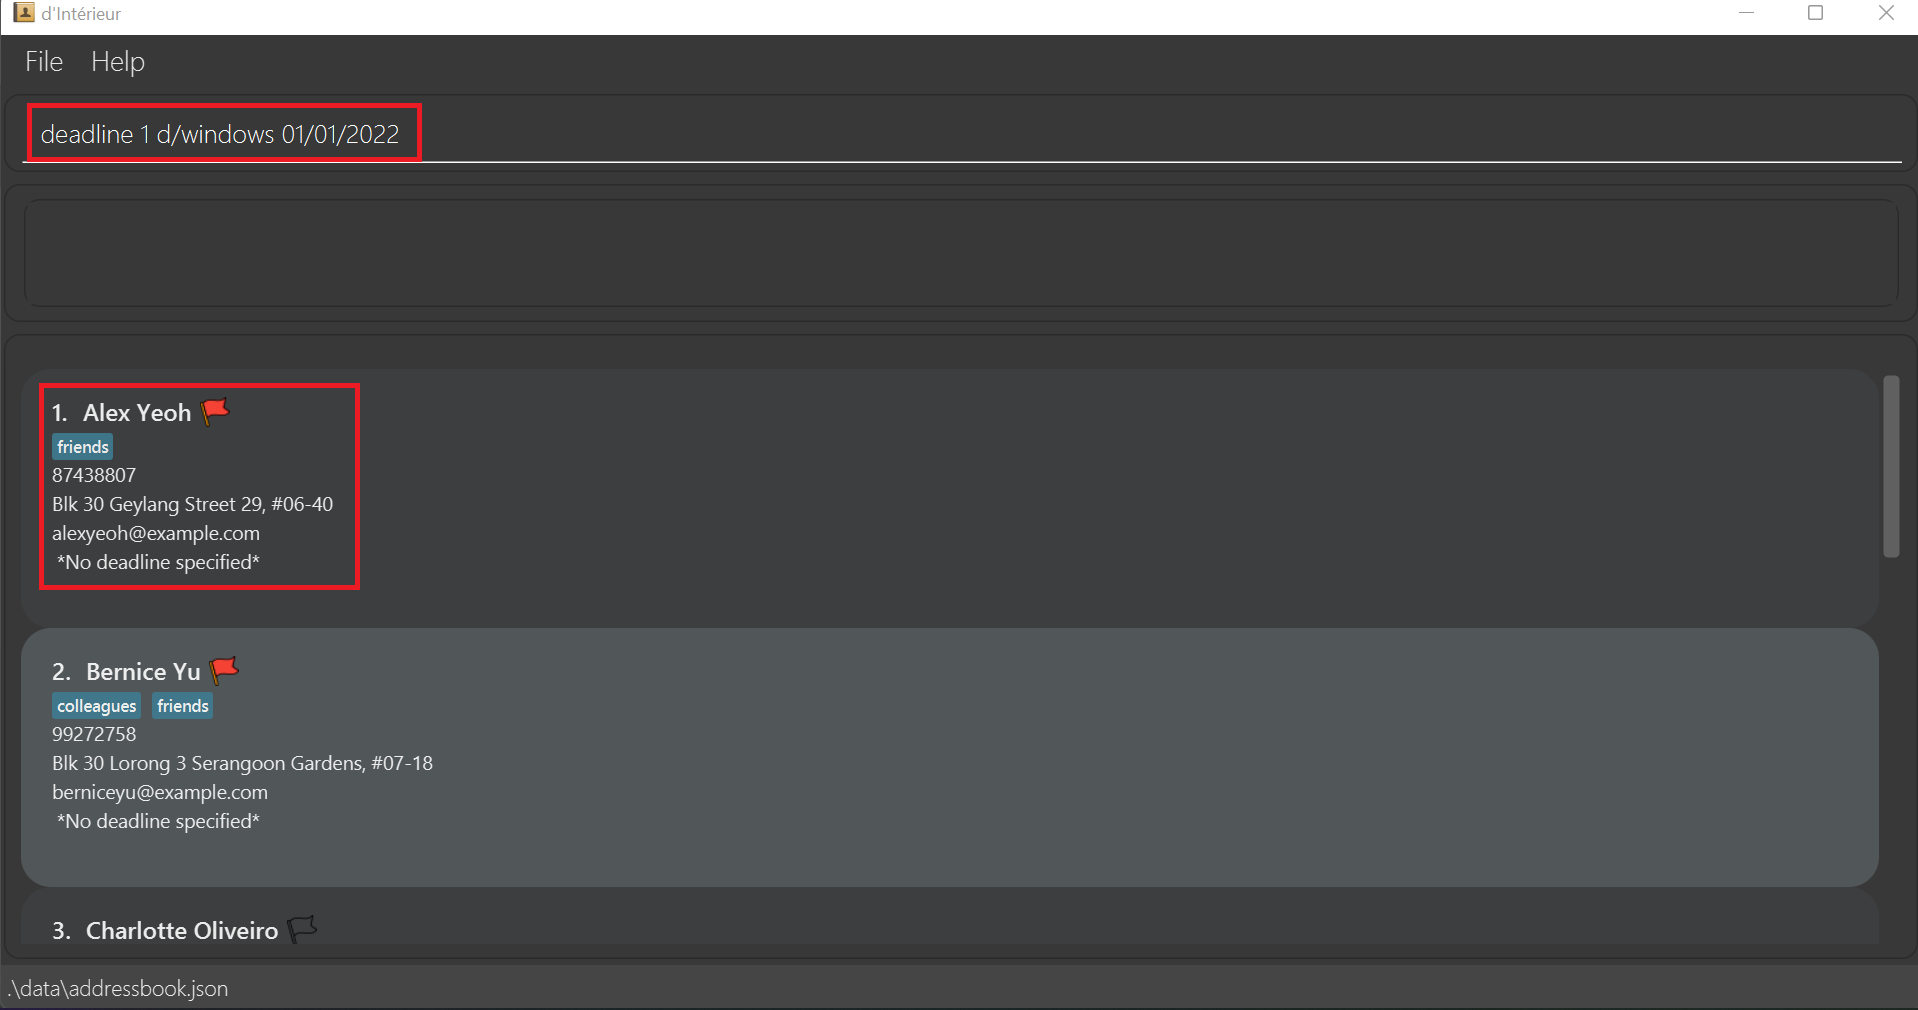
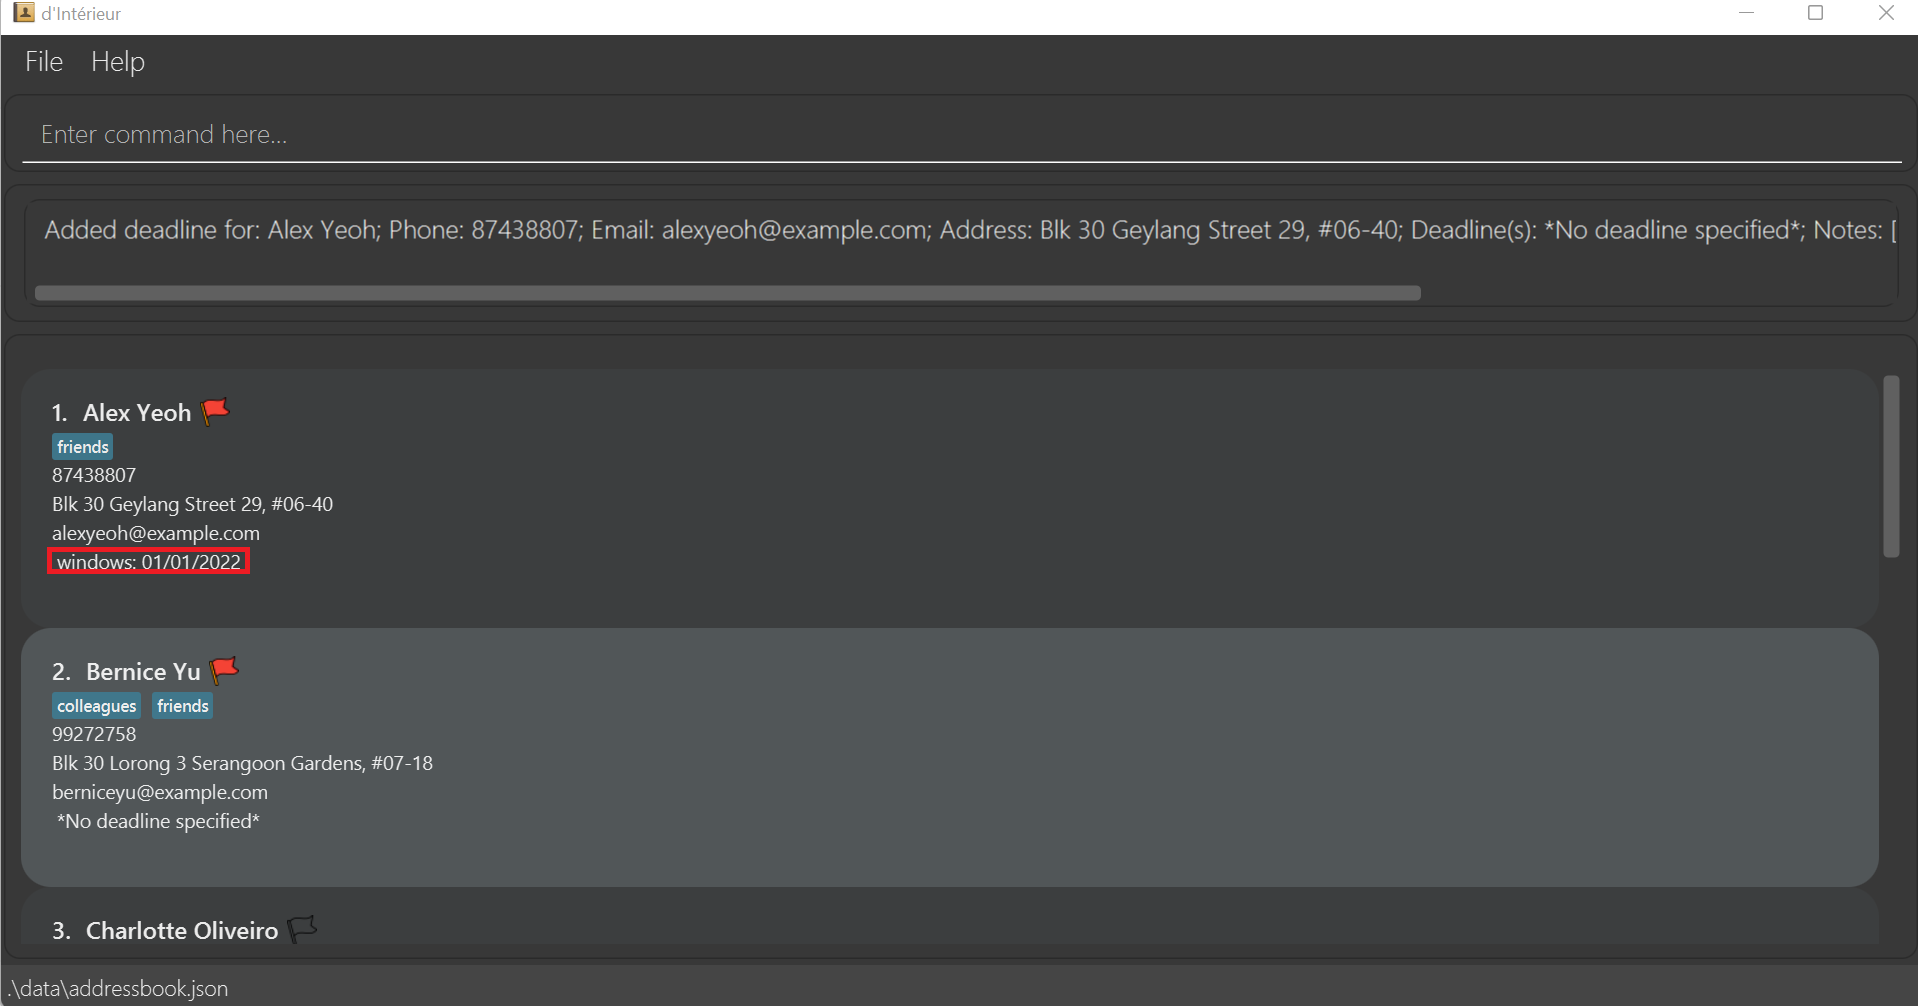
deadline 1 d/windows 01/01/2022adds a deadline with descriptionwindowsand date01/01/2022to the contact in index1.
List before deadline command:
List after deadline command:
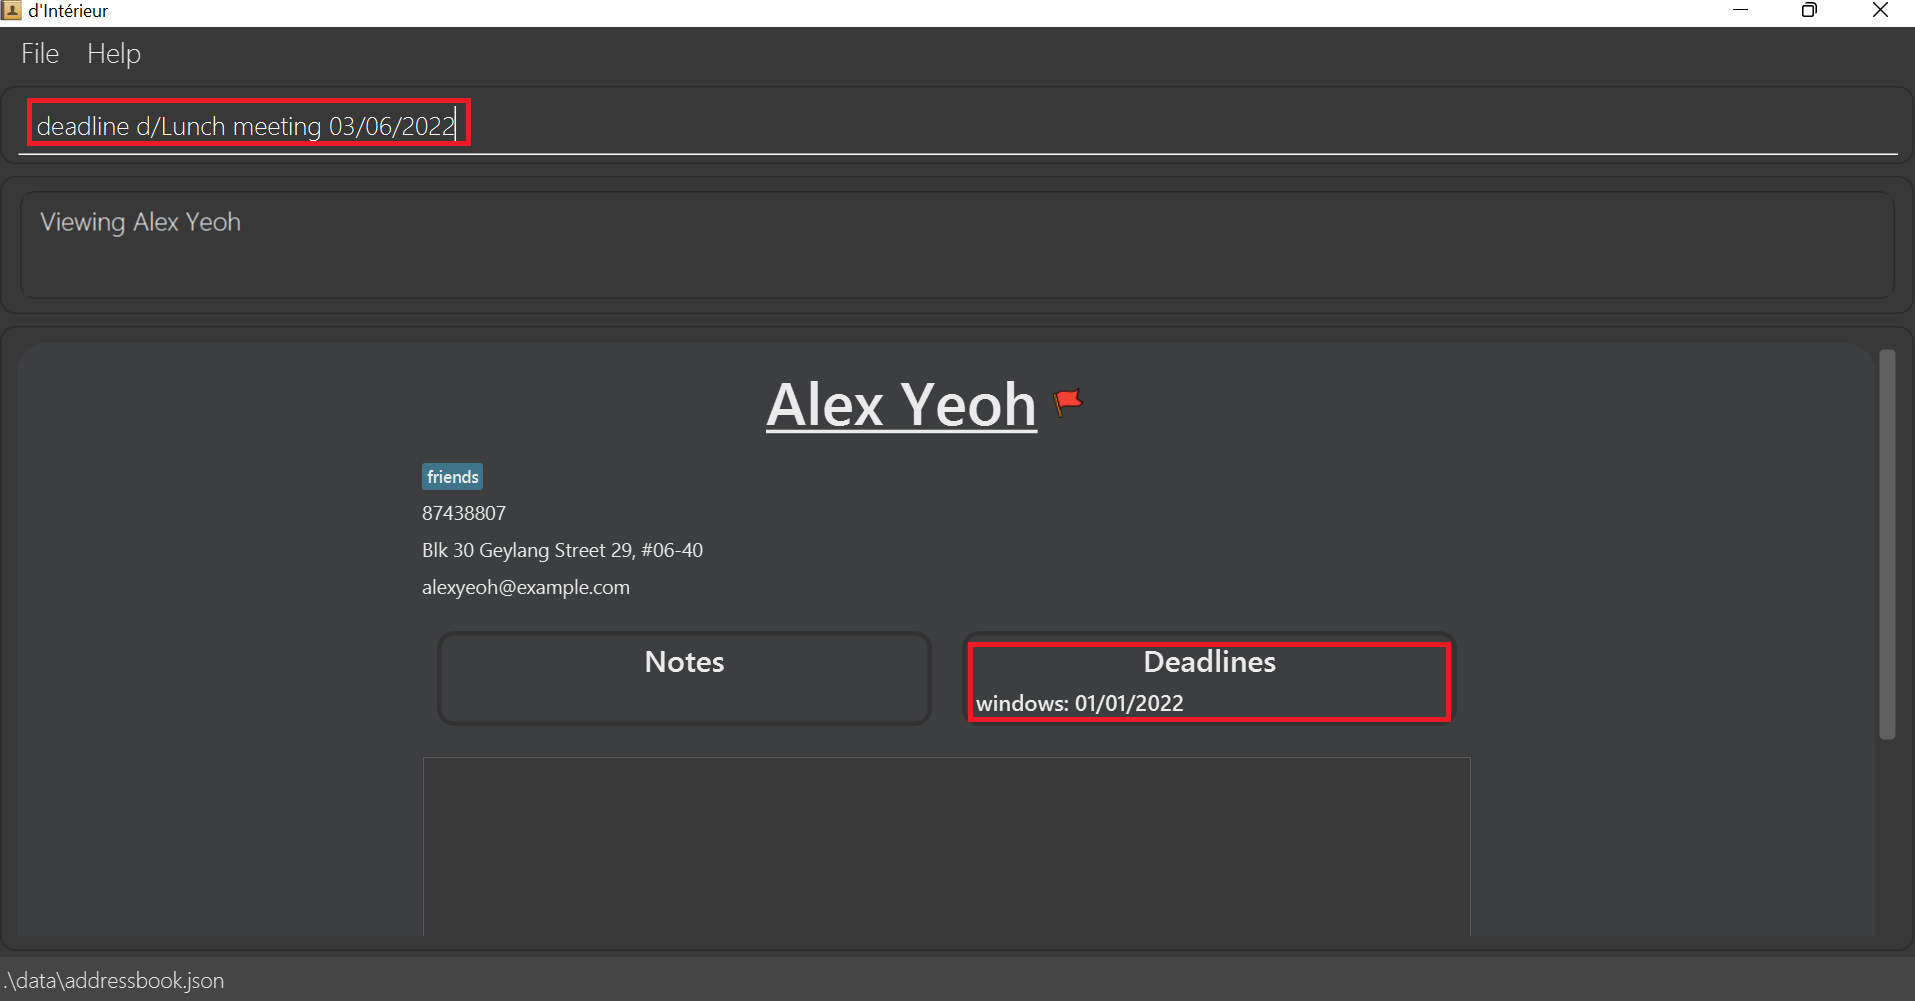
Format in detailed view: deadline d/DESCRIPTION DATE [d/DESCRIPTION DATE]...
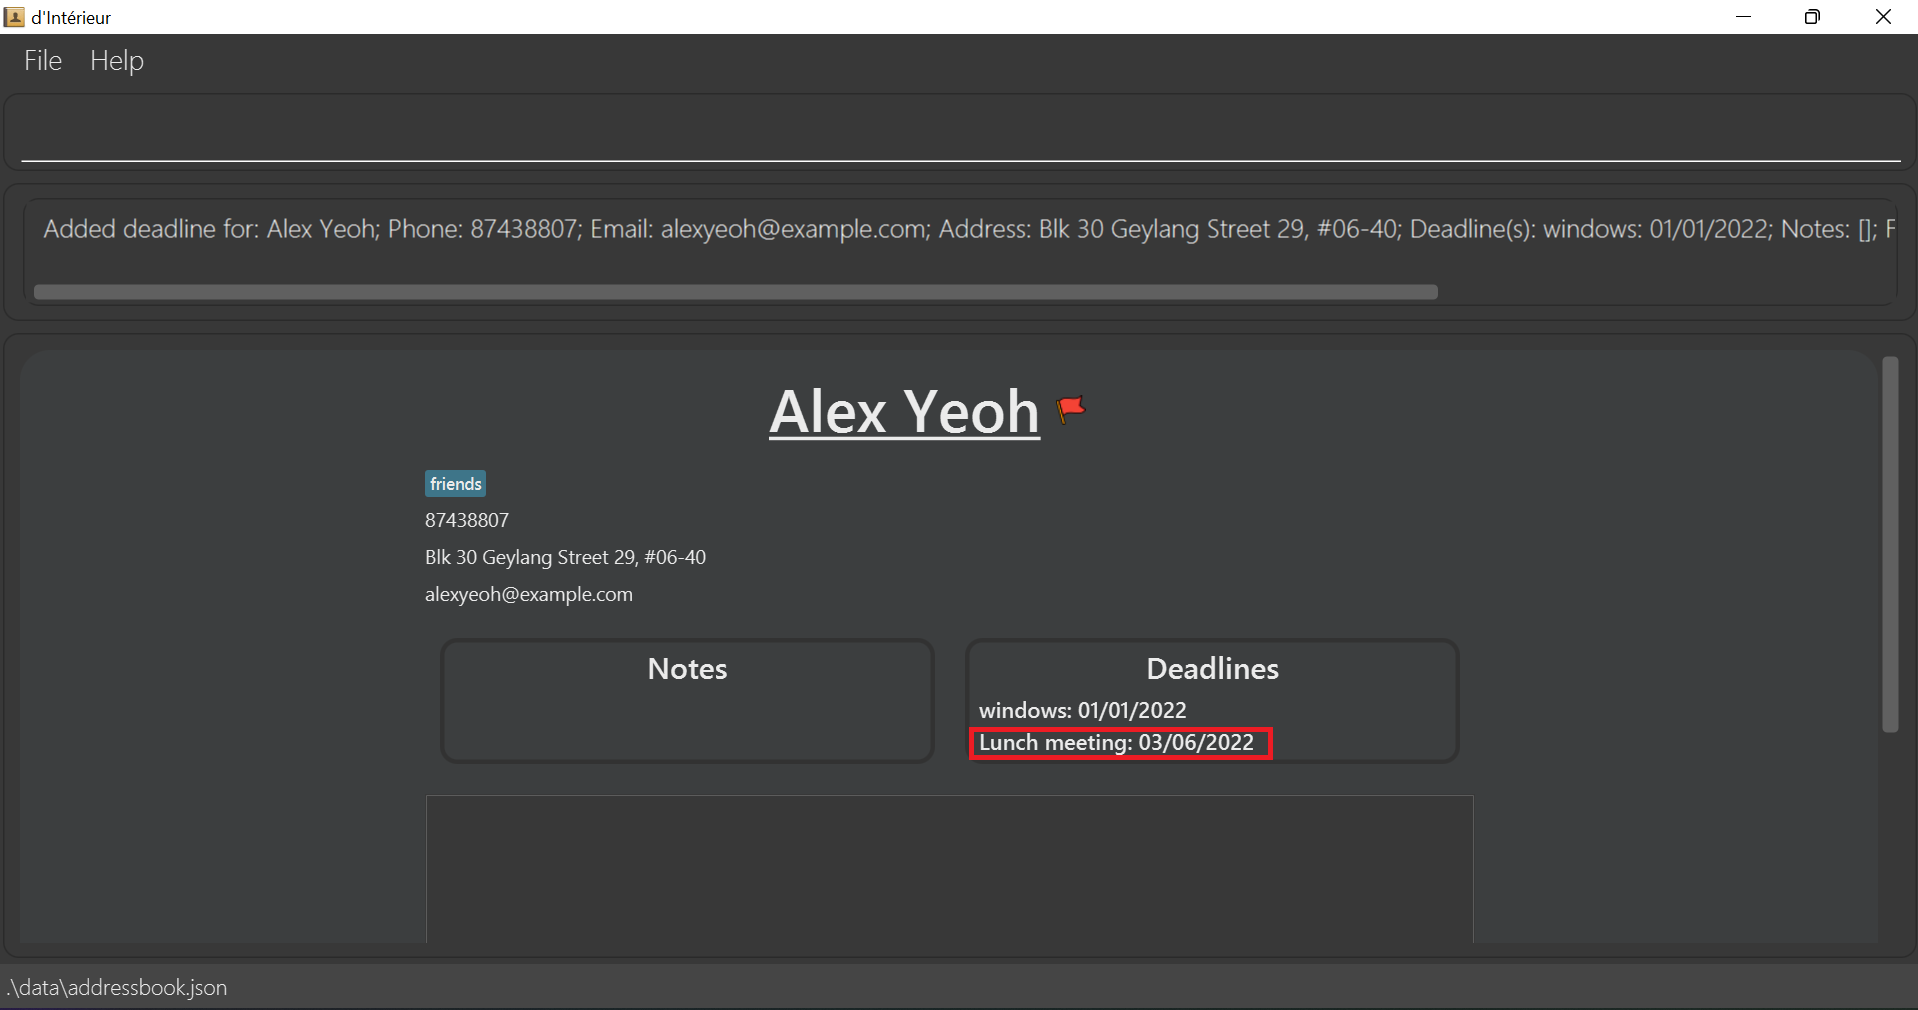
Example:
-
deadline d/Lunch meeting 03/06/2022adds a deadline with descriptionLunch meetingand date03/06/2022to the currently viewed contact.
Interface before deadline command in detailed view mode:
Interface after deadline command in detailed view mode:
Deleting a deadline from a contact : deldl
Deletes the deadline under the contact in detailed view. This command cannot be used in list view.
Format: deldl INDEX
- Deletes the note at the index of the list of deadlines displayed.
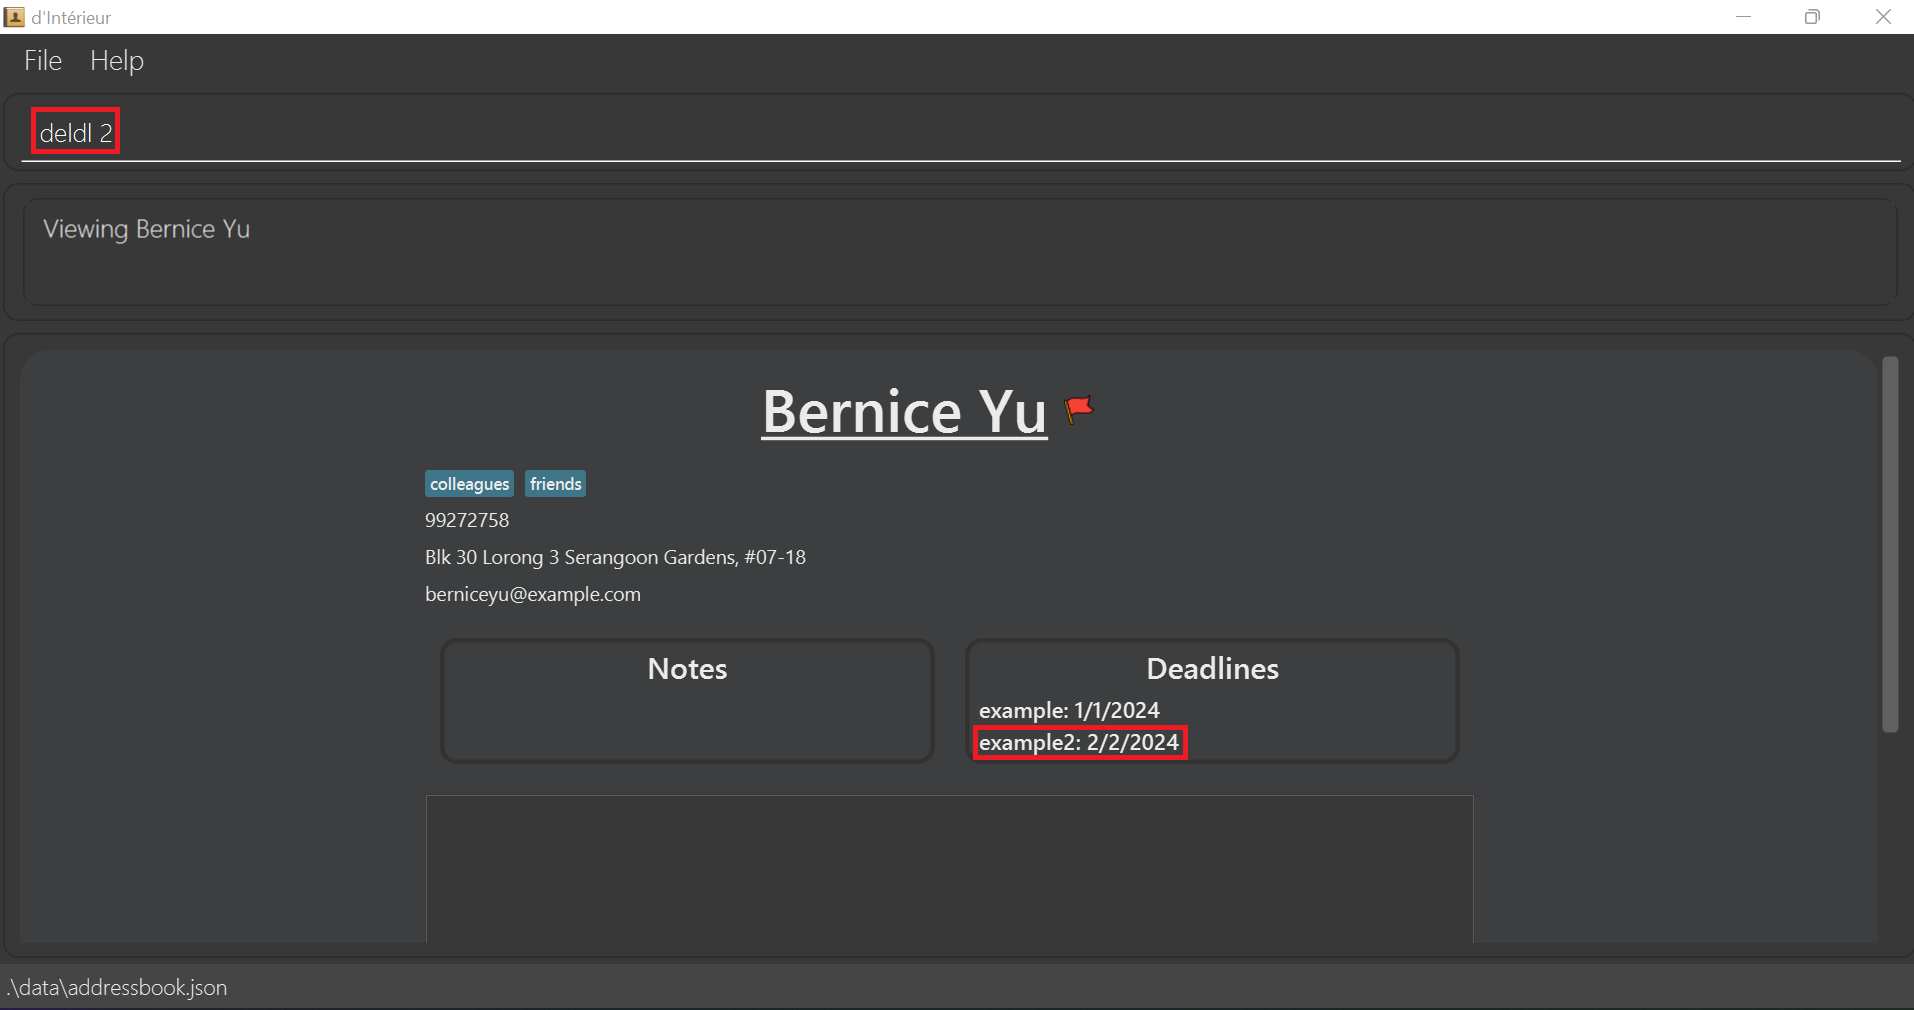
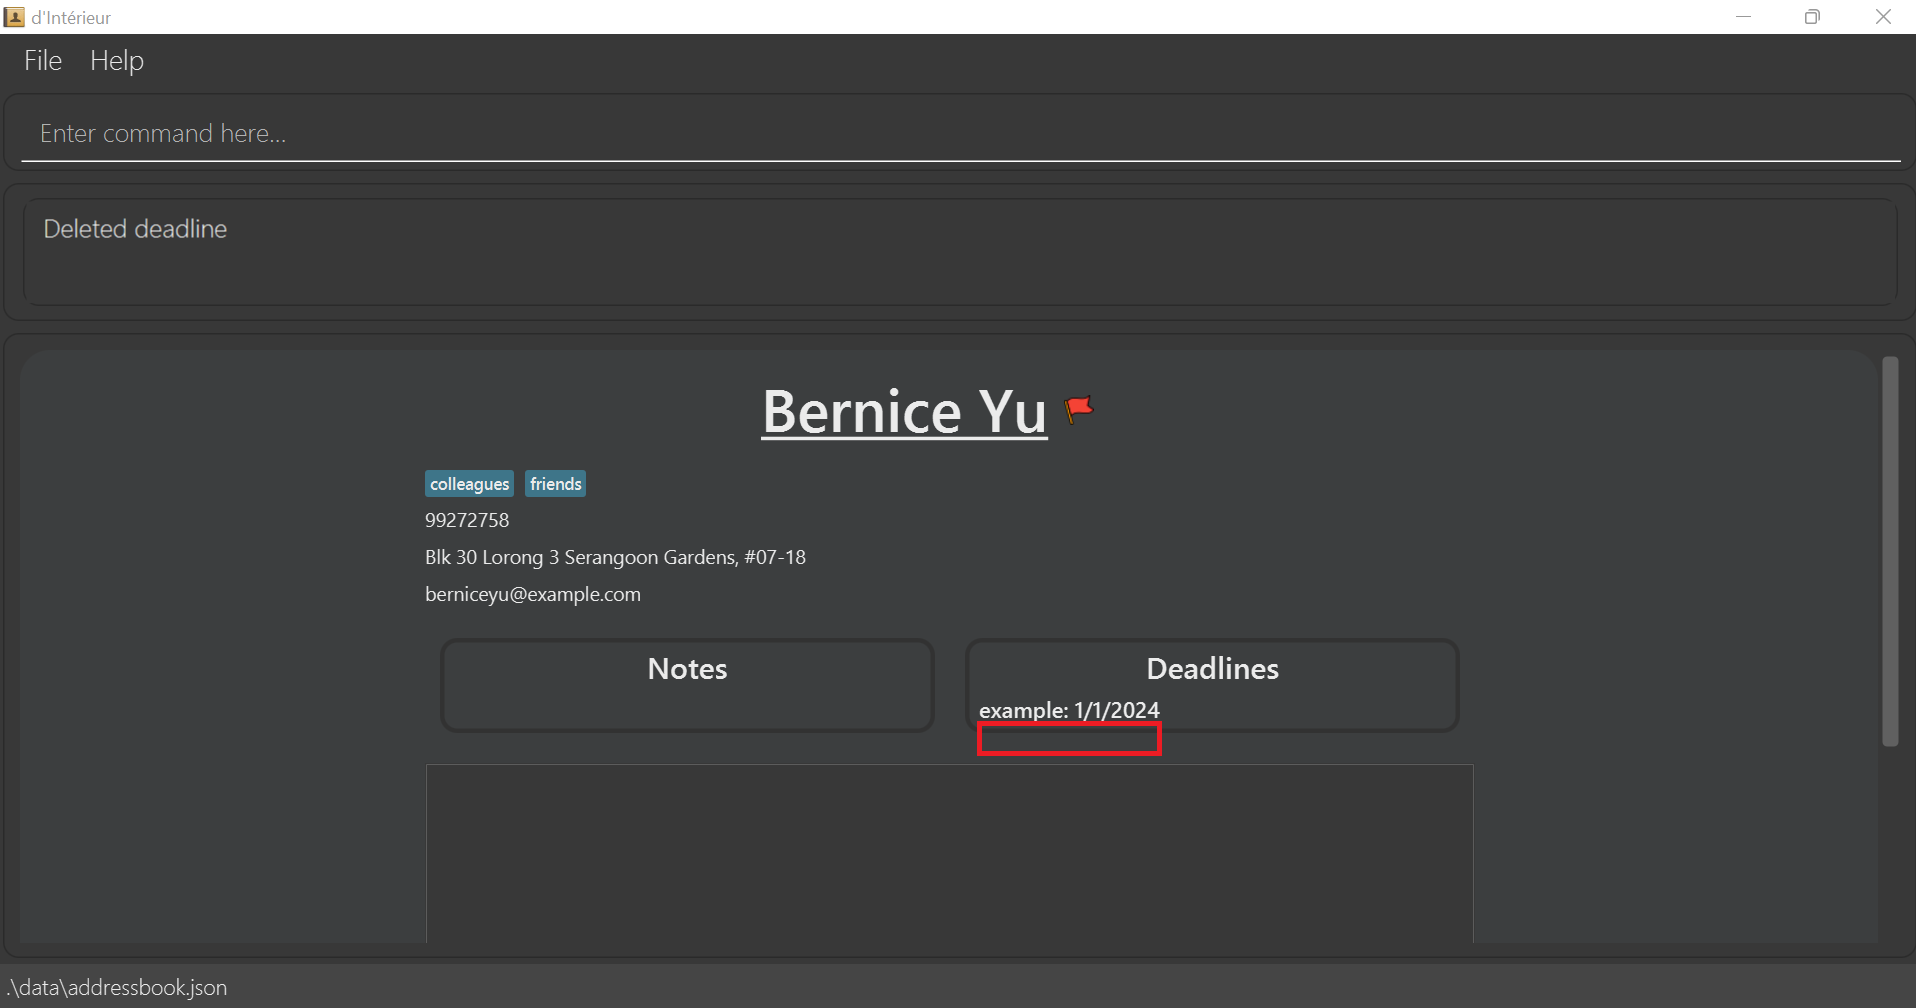
Example:
-
view 2shows you the detailed view of the contact at index 2, then usingdeldl 2will delete the second deadline in the notes list of the contact
Interface before deldl command:
Interface after deldl command:
Adding additional notes to a contact : note
Adds the given note under the contact. This command can be used in detailed view.
Format: note INDEX r/NOTES
- Notes are displayed in a list.
- The given note is appended to the existing list of notes at the end.
Example:
-
note 2 r/loves greenwill add a note under the contact at index 2 that readsloves green.
Format in detailed view: note r/NOTES
Example:
-
note r/Likes wood furniturewill add a note to currently viewed contact that readsLikes wood furniture.
Deleting notes from a contact : delnote
Deletes the note under the contact in detailed view. This command cannot be used in list view.
Format: delnote INDEX
- Deletes the note at the index of the list of notes displayed.
Example:
-
view 1shows you the detailed view of the contact at index 1, then usingdelnote 2will delete the second note in the notes list of the contact
Adding images : addimg
Add image(s) to a contact.
Format: addimg INDEX
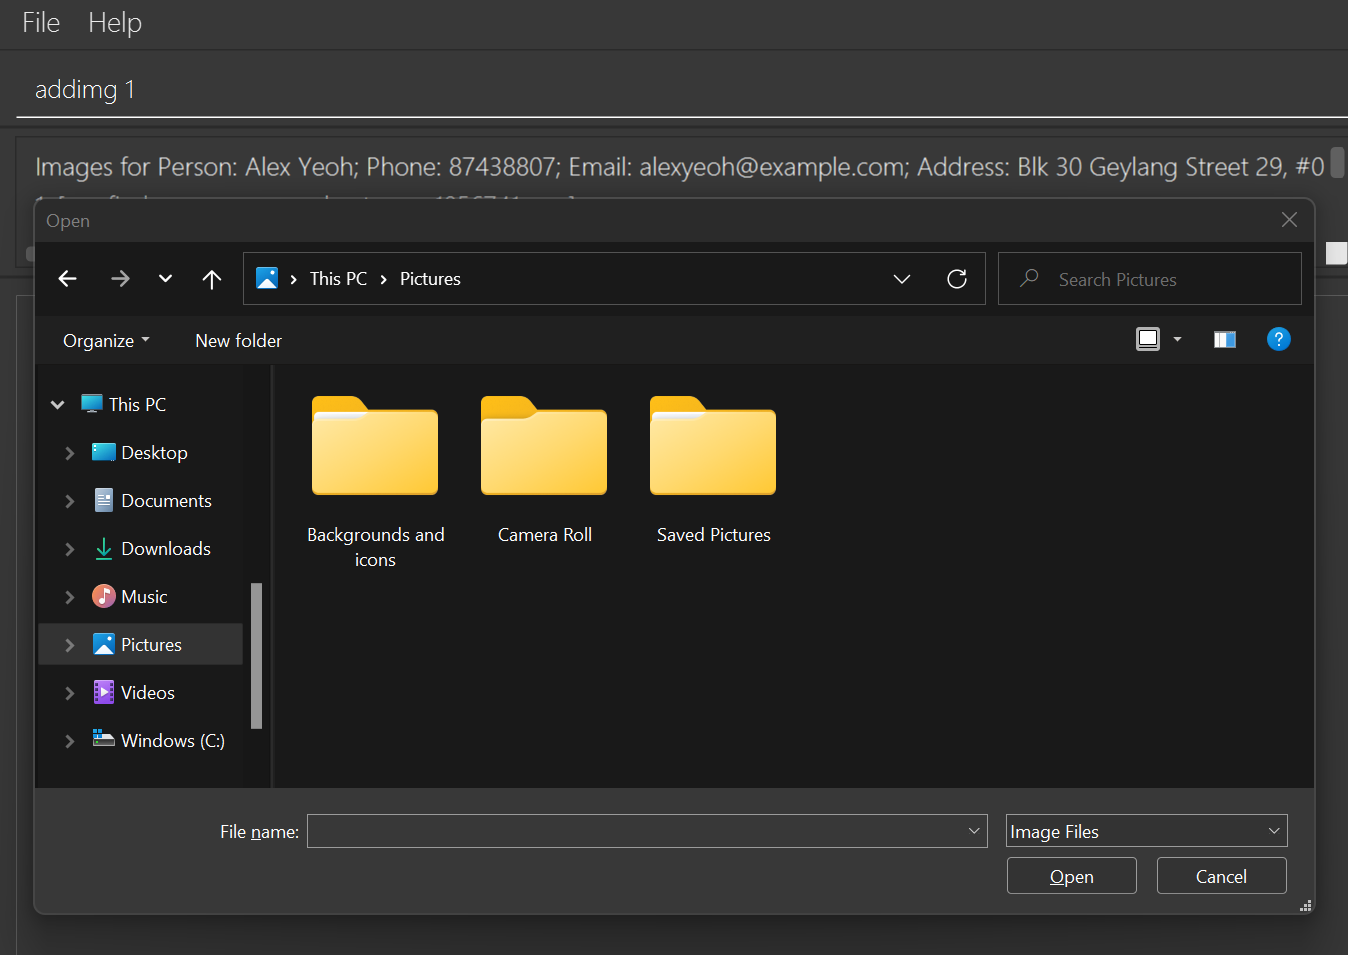
- Upon running the command, a file chooser will appear for you to select images from.
- Images can be in
.pngor.jpgformats. - Images uploaded cannot have duplicate names.
List contact’s images : images
Lists the contact’s image(s).
Format: images INDEX
- You can click on the images to get a focused view of the image.
Deleting images : delimg
Deletes the image(s) associated with a contact.
Format: delimg INDEX i/IMAGE_INDEX
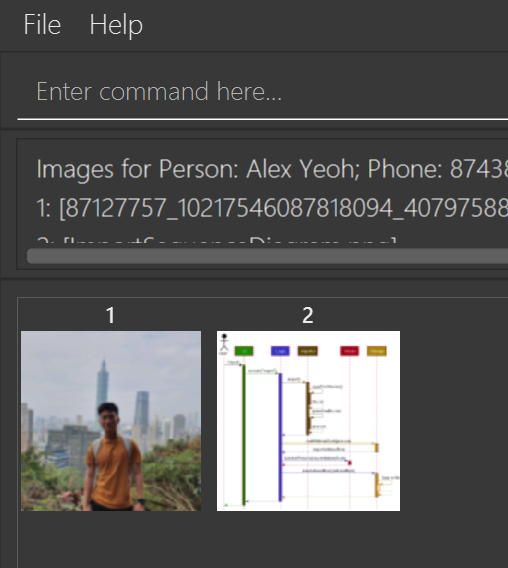
- An image’s index is relative to the person it belongs to.
- You can identify it by running the images command for a given user
(as seen in the above image). The
IMAGE_INDEXof the image will be directly above the image itself.
Example:
delimg 1 i/2 will delete the second image of the contact
Clearing all entries : clear
Clears all entries from the address book. This command can only be used in list view.
Format: clear
Navigating your contact list
As your contact list grows larger, you may start having trouble finding the contact you are looking for. However, with these commands to aid you, finding contacts will still be easy and intuitive.
Listing Favourites : favourites
Lists all your favourite contacts to the list of displayed contacts. This command only works in list view.
Format: favourites
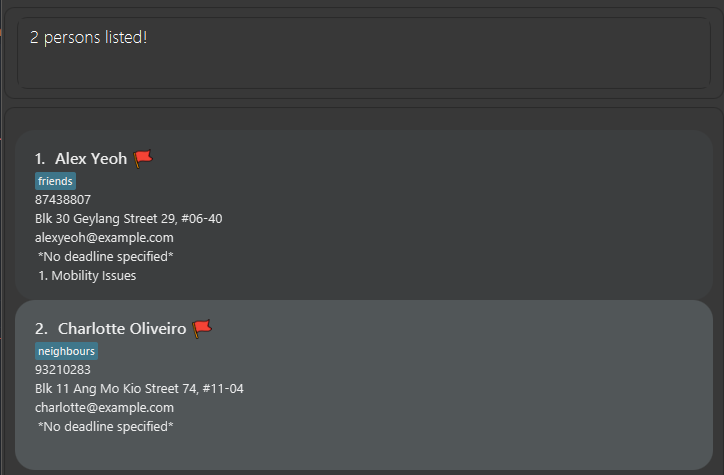
Listing contacts with high importance : impts
Shows you all contact(s) with high importance, tagged with the red flag. This command only works in list view.
Format: impts
Examples:
-
You can enter
impt 1followed byimpt 3to add a red flag beside contacts at index 1 and index 3.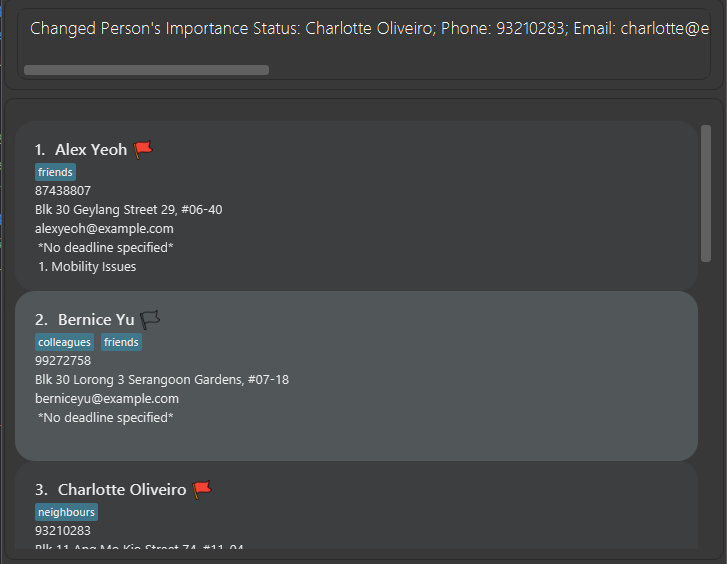
-
Use
imptsto list all of your contacts that has been tagged with the red flag.
Prioritising relevant contacts to you : sort
Sort contacts by given criteria. This command only works in list view.
Format: sort CRITERIA
-
CRITERIAshould be written in lower-case.
CRITERIA |
Order |
|---|---|
address |
Alphabetically sorted |
deadline |
Early dates to later dates |
email |
Alphabetically sorted |
fav |
Favourited contacts to not favourited contacts |
impt |
HighImportant contacts to not HighImportant contacts |
name |
Alphabetically sorted |
phone |
Numerically sorted |
Locating contacts by name : find
Find contacts whose names contain any of the given keywords. This command only works in list view.
Format: find KEYWORD [MORE_KEYWORDS]
- The search is case-insensitive. e.g
hanswill matchHans - The order of the keywords does not matter. e.g.
Hans Bowill matchBo Hans - Only the name is searched.
-
Only full words will be matched e.g.
Hanwill not matchHans - Contacts matching at least one keyword will be returned (i.e.
ORsearch). e.g.Hans Bowill returnHans Gruber,Bo Yang
Examples:
-
find JohnreturnsjohnandJohn Doe -
find alex davidreturnsAlex Yeoh,David Li
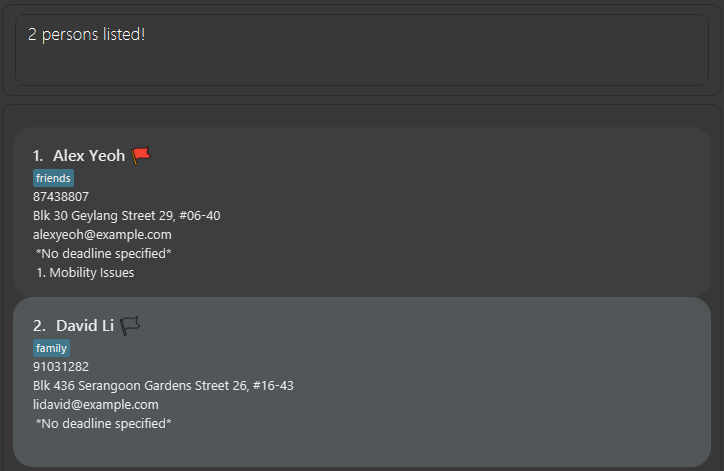
Locating contacts by tag : findtag
Find contacts based on the selected tags given by keywords to search for. This command only works in list view.
Format: findtag KEYWORD [MORE_KEYWORDS]
-
Each
findtagcommand selects aTAGto be found by using the givenKEYWORDe.g.-
findtag friendsaddsfriendsas a tag to be searched for -
findtag colleaguesaddscolleaguesto pre-existing search, now containing both colleagues and friends
-
- The search is case-insensitive. e.g
tagwill matchTag - Only the tag is searched
-
Only full words will be matched e.g.
Tawill not matchTag - List of contacts matching at least the searched tag(s) will be returned. e.g.
Tag1will returnContactA with tagsTag1andTag2.
list to clear currently selected tags!
Examples:
-
findtag Friendsreturns contacts with tagFriends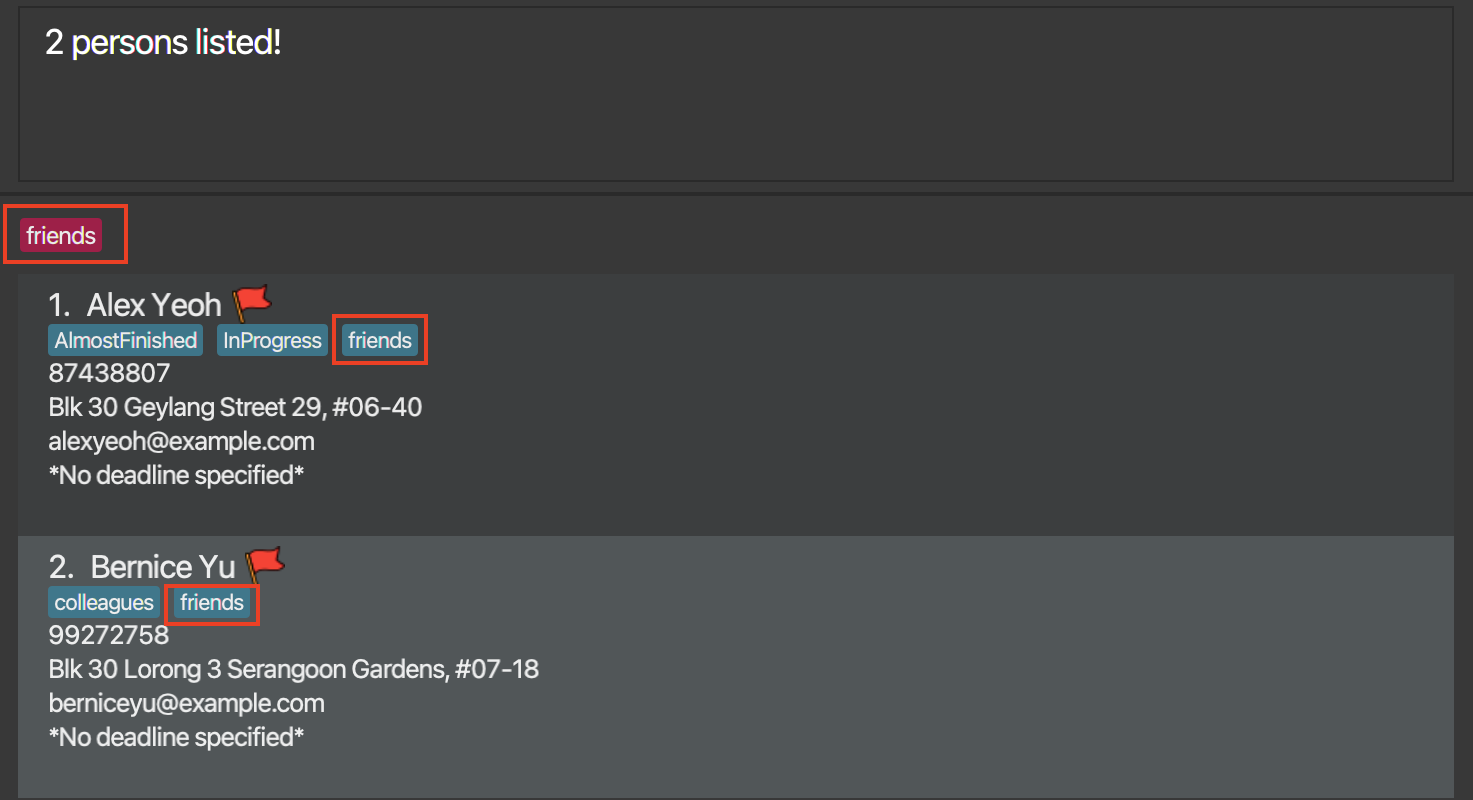
-
findtag Friendsfollowed byfindtag InProgress AlmostFinishedreturns contacts tagged by at leastFriends,InProgressandAlmostFinished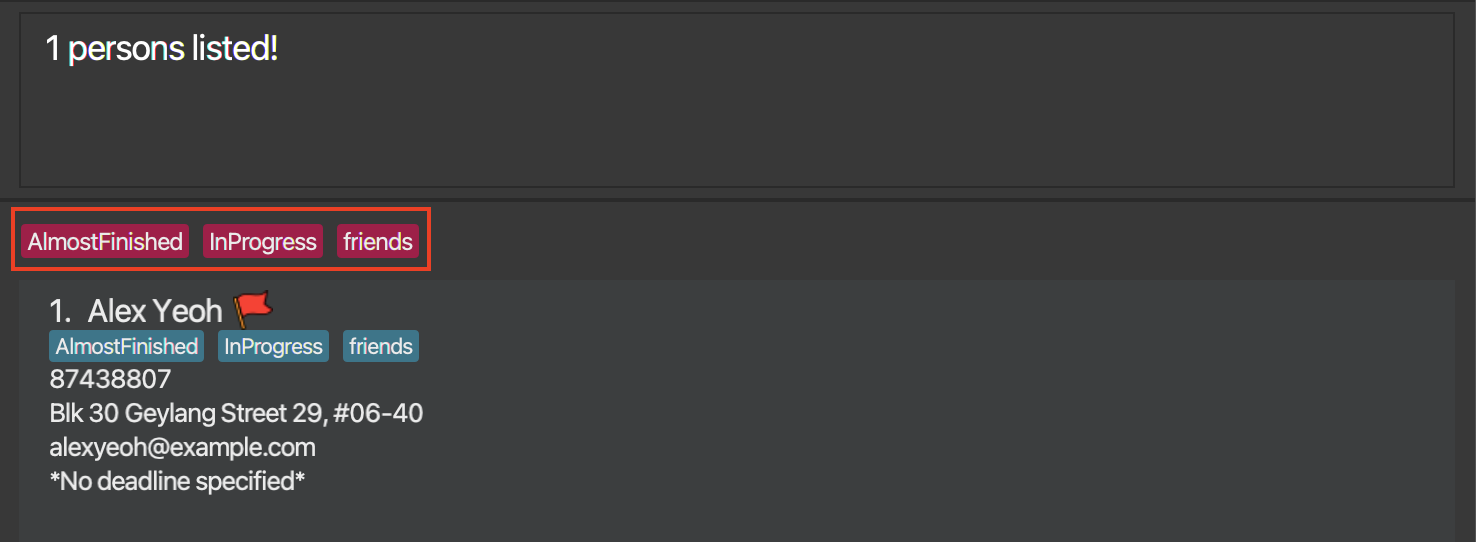
Saving the data
d’Intérieur data are saved in the hard disk automatically after any command that changes the data. There is no need to save manually.
Editing the data file
d’Intérieur data are saved as a JSON file [JAR file location]/data/addressbook.json. Advanced users are welcome to
update data directly by editing that data file.
Cycling through input history
You can cycle through your input history by hitting the up arrow key to go back to older inputs, and the down arrow key to your latest inputs. You can save time on typing repeat inputs, or re-writing erroneous inputs!
Archiving data files [coming in v2.0]
Details coming soon …
FAQ
Q: How do I transfer my data to another Computer?
A: Install the app in the other computer and overwrite the empty data file it creates with the file that contains
the data of your previous d’Intérieur home folder.
Command summary
Empty entries mean the commands cannot be used in the view.
| Action | Format, Examples in List View | Format, Examples in Detailed View |
|---|---|---|
| Add |
add n/NAME p/PHONE_NUMBER e/EMAIL [a/ADDRESS] [t/TAG]… e.g., add n/Mary Jane p/12345678 e/maryJ@example.com a/Bukit Timah t/completed
|
Same as list view |
| Add Image |
addimg INDEX e.g., addimg 1
|
addimg |
| Assign Tag |
assign INDEX TAGNAME e.g., assign 1 Friends
|
assign TAGNAME e.g., assign client
|
| Clear | clear |
- |
| Create Tag |
tag TAGNAME e.g., tag Friends
|
Same as list view |
| Deadline |
deadline INDEX d/DESCRIPTION DATE [d/DESCRIPTION DATE]... e.g., deadline 1 d/windows 01/01/2022
|
deadline d/DESCRIPTION DATE [d/DESCRIPTION DATE]... e.g., deadline d/Lunch meeting 03/06/2022
|
| Delete |
delete INDEXe.g., delete 3
|
- |
| Delete Deadline | - |
deldl INDEX e.g. deldl 2
|
| Delete Image |
delimg INDEX i/IMAGE_INDEX e.g., delimg 1 i/2
|
delimg i/IMAGE_INDEX e.g., delimg i/1
|
| Delete Note | - |
delnote INDEX e.g. delnote 2
|
| Delete Tag |
deltag TAGNAMEe.g., delete friends
|
- |
| Edit |
edit INDEX [n/NAME] [p/PHONE_NUMBER] [e/EMAIL] [a/ADDRESS] …e.g., edit 2 n/James Lee e/jameslee@example.com
|
edit [n/NAME] [p/PHONE] [e/EMAIL] [a/ADDRESS]… e.g., edit p/88438809 e/alex_yeoh@example.com
|
| Fav |
fav INDEX e.g., fav 1
|
fav |
| Find |
find KEYWORD [MORE_KEYWORDS]e.g., find James Jake
|
- |
| Find Tag |
findtag KEYWORD [MORE_KEYWORDS} e.g., findtag Friends
|
- |
| Help | help |
Same as list view |
| Impt |
impt INDEX e.g., impt 1
|
impt |
| Impts | impts |
- |
| Sort |
sort CRITERIA e.g., sort address
|
- |
| List | list |
Same as list view |
| List Favourites | favourites |
- |
| List Images |
images INDEX e.g., images 1
|
images |
| Note |
note INDEX r/NOTESe.g. note 2 r/loves green
|
note r/NOTES e.g., note r/Likes wood furniture
|
| Unassign Tag |
unassign INDEX TAGNAME e.g., unassign 1 Friends
|
unassign TAGNAME e.g., unassign client
|
| View |
view INDEX e.g., view 1
|
- |