Developer Guide
Table of Contents
- Acknowledgements
- Setting up, getting started
- Design
- Implementations
- Documentation, logging, testing, configuration, dev-ops
- Appendix: Requirements
- Appendix: Instructions for manual testing
Acknowledgements
- Star used to represent a favourited person
- Reused from https://zetcode.com/gui/javafx/canvas/ with minor modifications to the points and fill, for suitable colour and size.
Setting up, getting started
Refer to the guide Setting up and getting started.
Design
.puml files used to create diagrams in this document can be found in the diagrams folder. Refer to the PlantUML Tutorial at se-edu/guides to learn how to create and edit diagrams.
Architecture
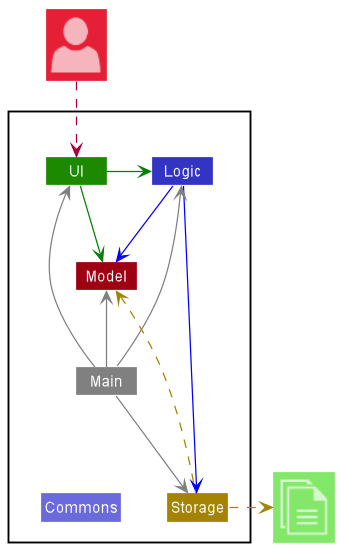
The Architecture Diagram given above explains the high-level design of the App.
Given below is a quick overview of main components and how they interact with each other.
Main components of the architecture
Main has two classes called Main and MainApp. It is responsible for,
- At app launch: Initializes the components in the correct sequence, and connects them up with each other.
- At shut down: Shuts down the components and invokes cleanup methods where necessary.
Commons represents a collection of classes used by multiple other components.
The rest of the App consists of four components.
-
UI: The UI of the App. -
Logic: The command executor. -
Model: Holds the data of the App in memory. -
Storage: Reads data from, and writes data to, the hard disk.
How the architecture components interact with each other
The Sequence Diagram below shows how the components interact with each other for the scenario where the user issues the command delete 1.
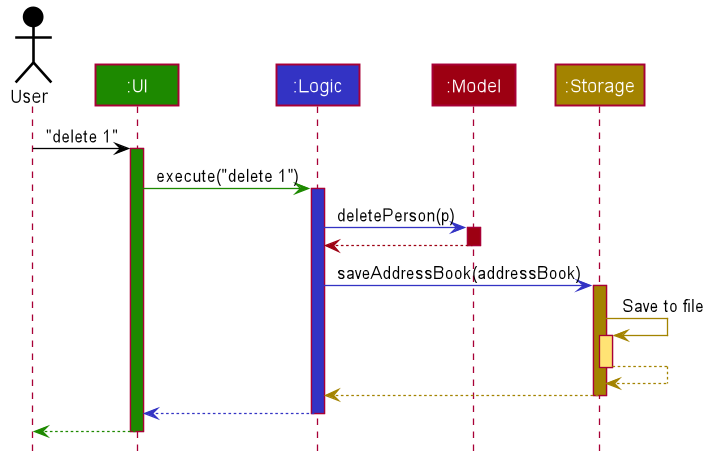
Each of the four main components (also shown in the diagram above),
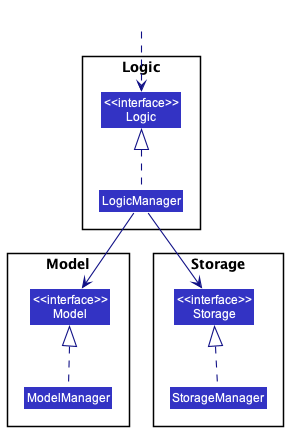
- defines its API in an
interfacewith the same name as the Component. - implements its functionality using a concrete
{Component Name}Managerclass (which follows the corresponding APIinterfacementioned in the previous point.
For example, the Logic component defines its API in the Logic.java interface and implements its functionality using the LogicManager.java class which follows the Logic interface. Other components interact with a given component through its interface rather than the concrete class (reason: to prevent outside component’s being coupled to the implementation of a component), as illustrated in the (partial) class diagram below.
The sections below give more details of each component.
UI component
The API of this component is specified in Ui.java
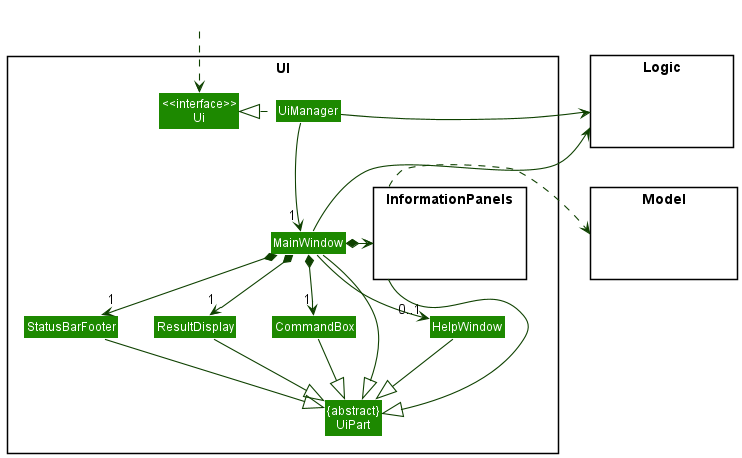
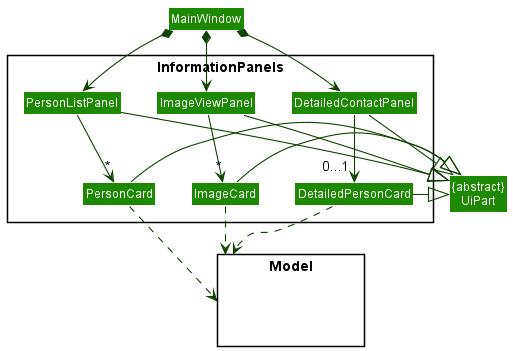
The UI consists of a MainWindow that is made up of parts e.g.CommandBox, ResultDisplay, PersonListPanel, StatusBarFooter etc. All these, including the MainWindow, inherit from the abstract UiPart class which captures the commonalities between classes that represent parts of the visible GUI.
The UI component uses the JavaFx UI framework. The layout of these UI parts are defined in matching .fxml files that are in the src/main/resources/view folder. For example, the layout of the MainWindow is specified in MainWindow.fxml
The UI component,
- executes user commands using the
Logiccomponent. - listens for changes to
Modeldata so that the UI can be updated with the modified data. - keeps a reference to the
Logiccomponent, because theUIrelies on theLogicto execute commands. - depends on some classes in the
Modelcomponent, as it displaysPersonobject residing in theModel.
Logic component
API : Logic.java
Here’s a (partial) class diagram of the Logic component:
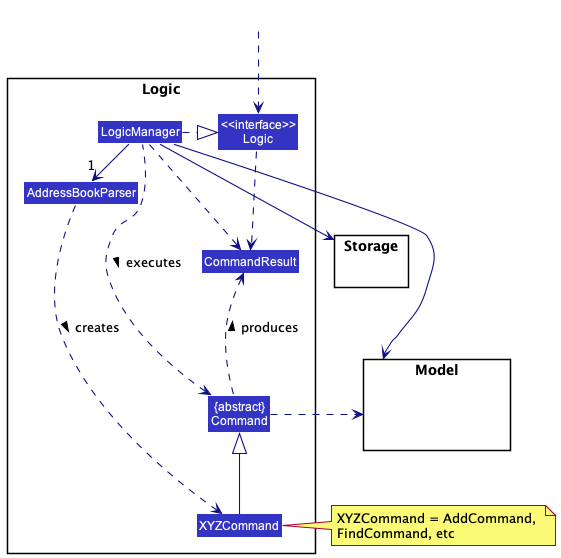
How the Logic component works:
- When
Logicis called upon to execute a command, it uses theAddressBookParserclass to parse the user command. - This results in a
Commandobject (more precisely, an object of one of its subclasses e.g.,AddCommand) which is executed by theLogicManager. - The command can communicate with the
Modelwhen it is executed (e.g. to add a person). - The result of the command execution is encapsulated as a
CommandResultobject which is returned back fromLogic.
The Sequence Diagram below illustrates the interactions within the Logic component for the execute("delete 1") API call.

DeleteCommandParser should end at the destroy marker (X) but due to a limitation of PlantUML, the lifeline reaches the end of diagram.
Here are the other classes in Logic (omitted from the class diagram above) that are used for parsing a user command:
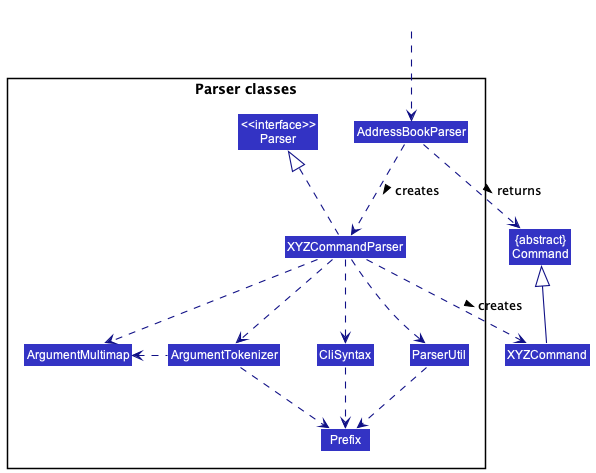
How the parsing works:
- When called upon to parse a user command, the
AddressBookParserclass creates anXYZCommandParser(XYZis a placeholder for the specific command name e.g.,AddCommandParser) which uses the other classes shown above to parse the user command and create aXYZCommandobject (e.g.,AddCommand) which theAddressBookParserreturns back as aCommandobject. - All
XYZCommandParserclasses (e.g.,AddCommandParser,DeleteCommandParser, …) inherit from theParserinterface so that they can be treated similarly where possible e.g, during testing.
Model component
API : Model.java
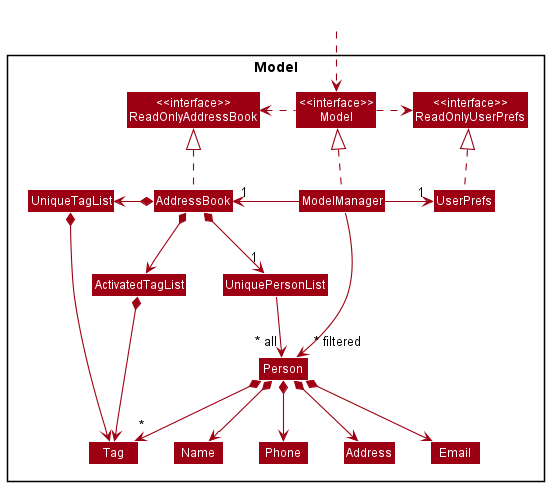
The Model component,
- stores the address book data i.e., all
Personobjects (which are contained in aUniquePersonListobject). - stores the currently ‘selected’
Personobjects (e.g., results of a search query) as a separate filtered list which is exposed to outsiders as an unmodifiableObservableList<Person>that can be ‘observed’ e.g. the UI can be bound to this list so that the UI automatically updates when the data in the list change. - stores a
UserPrefobject that represents the user’s preferences. This is exposed to the outside as aReadOnlyUserPrefobjects. - does not depend on any of the other three components (as the
Modelrepresents data entities of the domain, they should make sense on their own without depending on other components)
Storage component
API : Storage.java

The Storage component,
- can save both address book data and user preference data in json format, and read them back into corresponding objects.
- inherits from both
AddressBookStorageandUserPrefStorage, which means it can be treated as either one (if only the functionality of only one is needed). - depends on some classes in the
Modelcomponent (because theStoragecomponent’s job is to save/retrieve objects that belong to theModel)
Common classes
Classes used by multiple components are in the seedu.addressbook.commons package.
Implementations
This section describes some noteworthy details on how certain features are implemented.
Adding attributes to contacts
Notes feature
Implementation
The Notes class encapsulates a List
In the execution of a command that modify a contact’s notes, for instance, the NoteCommand which adds a given note to a contact, a new Person object is created with the new Notes object. Thus, this implementation of Notes avoids the problem of aliasing between different Person objects, and reduces coupling.
The sequence diagram below illustrates this behaviour.
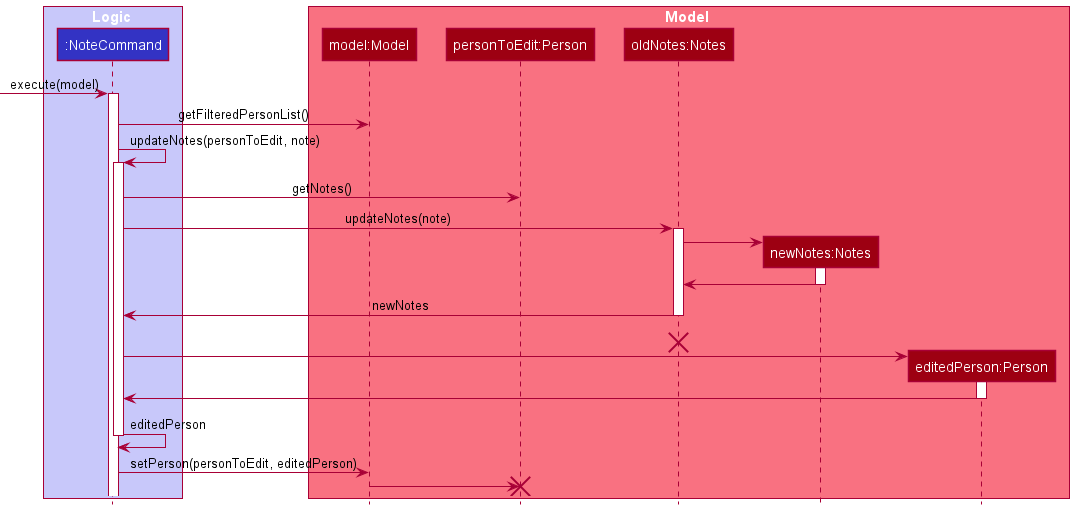
personToEdit and oldNotes should end at the destroy marker (X) but due to a limitation of PlantUML, the lifelines reaches the end of diagram.
This implementation is in line with other forms of editing a contact, and will facilitate new features you may plan to implement, such as the planned undo/redo feature.
Another reason for this implementation is the ease of testing. You will find that the TypicalPersons contains Person objects as the baseline to create a list of contacts. Writing tests for Notes is easier without having to intently reverse any changes to the Notes of these Persons.
Favourite feature
Implementation
The favourites feature is implemented by identifying the user’s favourite contacts through their favouriteStatus state, which is stored as a Persons field. The favourite-status of a person is represented by a Favourite, which can be either IS_FAVOURITE, or NOT_FAVOURITE singletons.
Although it is a Persons field, it cannot be instantiated in an add command, nor modified through an edit command, unlike other fields such as “name” or “address”. It should be thought of as metadata for the contact, and is set as NOT_FAVOURITE by default.
As such, a contact’s favourite-status is handled through the FavouritesCommand, which extends Command. Toggles the contact’s favourite status based on their current favourite-status. Its execution behaves rather similarly to edit, and has its own FavouritesCommand#createFavouritedPerson(target, newPerson) operation.
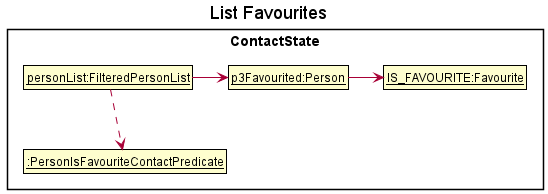
As part of the favourites feature, a user can also list all their favourite contacts through the ListFavouritesCommand, which extends Command as well. It leverages on the PersonIsFavouriteContactPredicate, which can be passed as an argument to Model#updateFilteredPersonList(predicate)
Given below is an example scenario of the favourites feature in operation.
Step 1. When a user is created, they are automatically assigned NOT_FAVOURITE as their favourite-status.
Step 2. The user executes fav 3 command to favourite the 3rd person in the address book. The fav command executes and determines the current favouriteStatus of the contact (which in this case is NOT_FAVOURITE). It then calls the private helper method createFavouritedPerson to create a copy of the target contact, except with their favouriteStatus now pointing to the opposite Favourite value (which will be the IS_FAVOURITE singleton).
Step 3. The command execution continues on to replace the existing person object with the newly favourited contact through Model#setPerson. After the execution successfully terminates, the user can visually identify their favourite contacts through the yellow star right beside their contact names.
Step 4. The user decides that they want to see only their favourite contacts. The favourites command will then execute, passing the PersonIsFavouriteContactPredicate into the Model#updateFilteredPersonList.
The following sequence diagram shows how the favourite operation works:
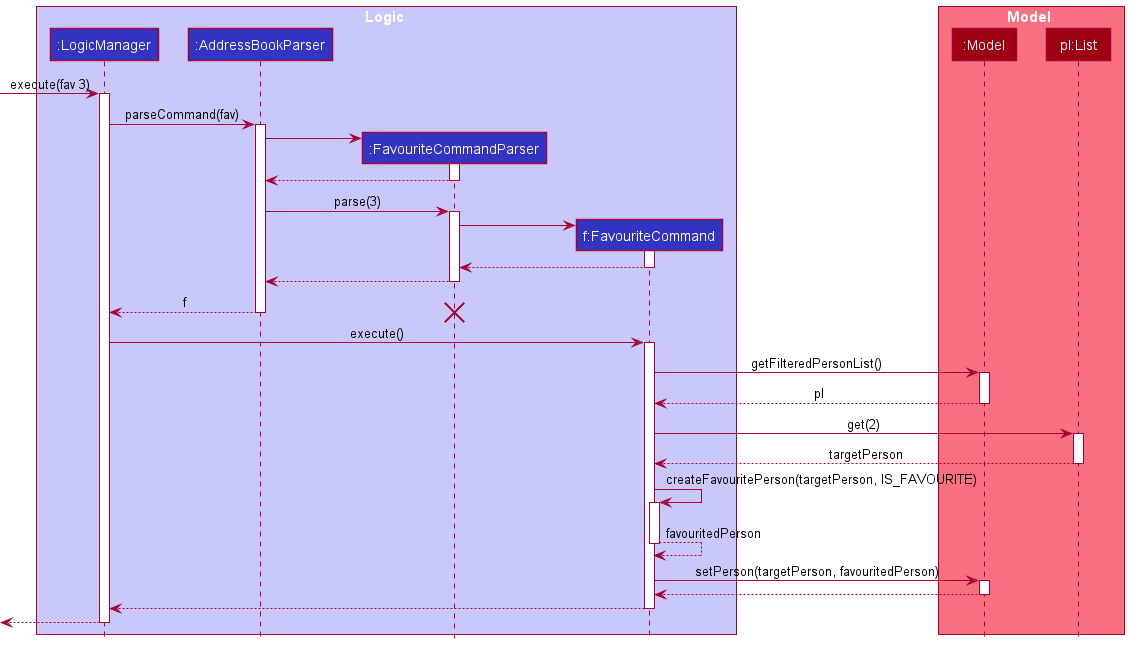
FavouriteCommandParser should end at the destroy marker (X) but due to a limitation of PlantUML, the lifeline reaches the end of diagram.
If the user runs fav 3 again, or commands fav on an existing favourited contact, the only difference in the execution would be that the NOT_FAVOURITE reference will be passed into the FavouriteCommand#createFavouritePerson method instead.
From the user experience point of view, not having an un-favourite command is intuitive. In order to favourite a contact, they will need to look-up their current index number, in which case, they will already know if they are a favourite contact or not. This makes toggling instead of hard-setting the favourite status of a contact feasible, and reduces the number of commands the user has to remember.
Design considerations:
Aspect: How favourite and list favourite commands execute:
-
Alternative 1 (current choice): Each person responsible for their own favourite state
- Pros:
- Less coupling between favourite and other commands such as edit and delete, as well as the model.
- Easy to reference to check favourite status of contact.
- Easy to implement.
- Cons:
- Adds more fields to the person contact, increasing the complexity of the contact in the long run.
- Need to have a
Favouriteclass to represent a contact’s status.
- Pros:
-
Alternative 2: Store favourited contacts into a
FavouritePersonList.- Pros:
- No need to add field into
Personsclass. - No need to have
Favouriteclass, which basically just acts as a boolean. -
Listcommand will be easy to implement.
- No need to add field into
- Cons:
- Have to update the
FavouritePersonListif a favourited contact has been modified. - Needs more work, specially within the storage.
- Have to update the
- Pros:
Deadline feature
Implementation
The deadline mechanism borrows from the current edit mechanism. The main idea of the mechanism is creating a new Person object with added deadline, then replace existing Person in list with the new Person.
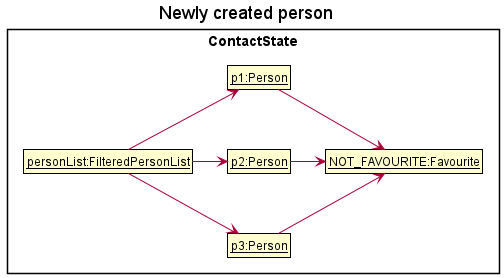
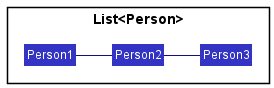
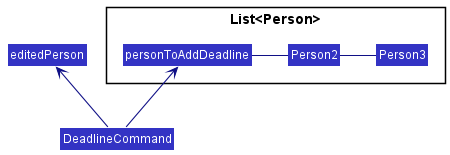
Step 1. The user is currently on the screen displaying the list of Person.
Diagram below represents the list of Person
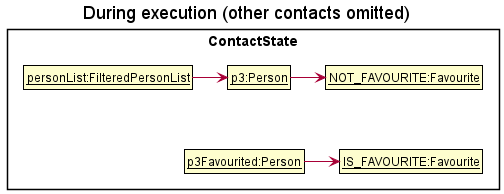
Step 2. The user executes deadline 1 /d return book 1/1/2023 command to add the deadline 1/1/2023 with description return book to the first person in the address book.
deadline is supported, for example: deadline 1 /d return book 1/1/2023 /d write report 5/1/2023.
Step 3. The DeadlineCommand#execute() method will find the Person at the index specified.
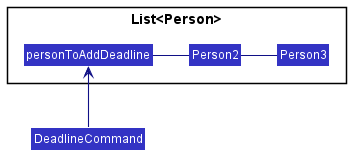
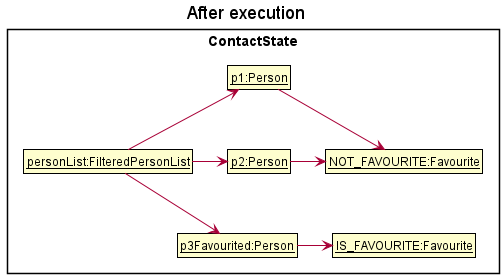
Step 4. After getting personToAddDeadline, DeadlineCommand#execute() method creates a new Person called editedPerson with added Deadline and all the other attributes of personToAddDeadline.
Step 5. The editedPerson replaces the personToAddDeadline in the list.
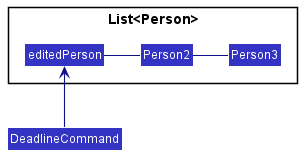
Step 6. The UI displays the updated list.
Diagram below shows the execution of deadline 1 /d return book 1/1/2023 command
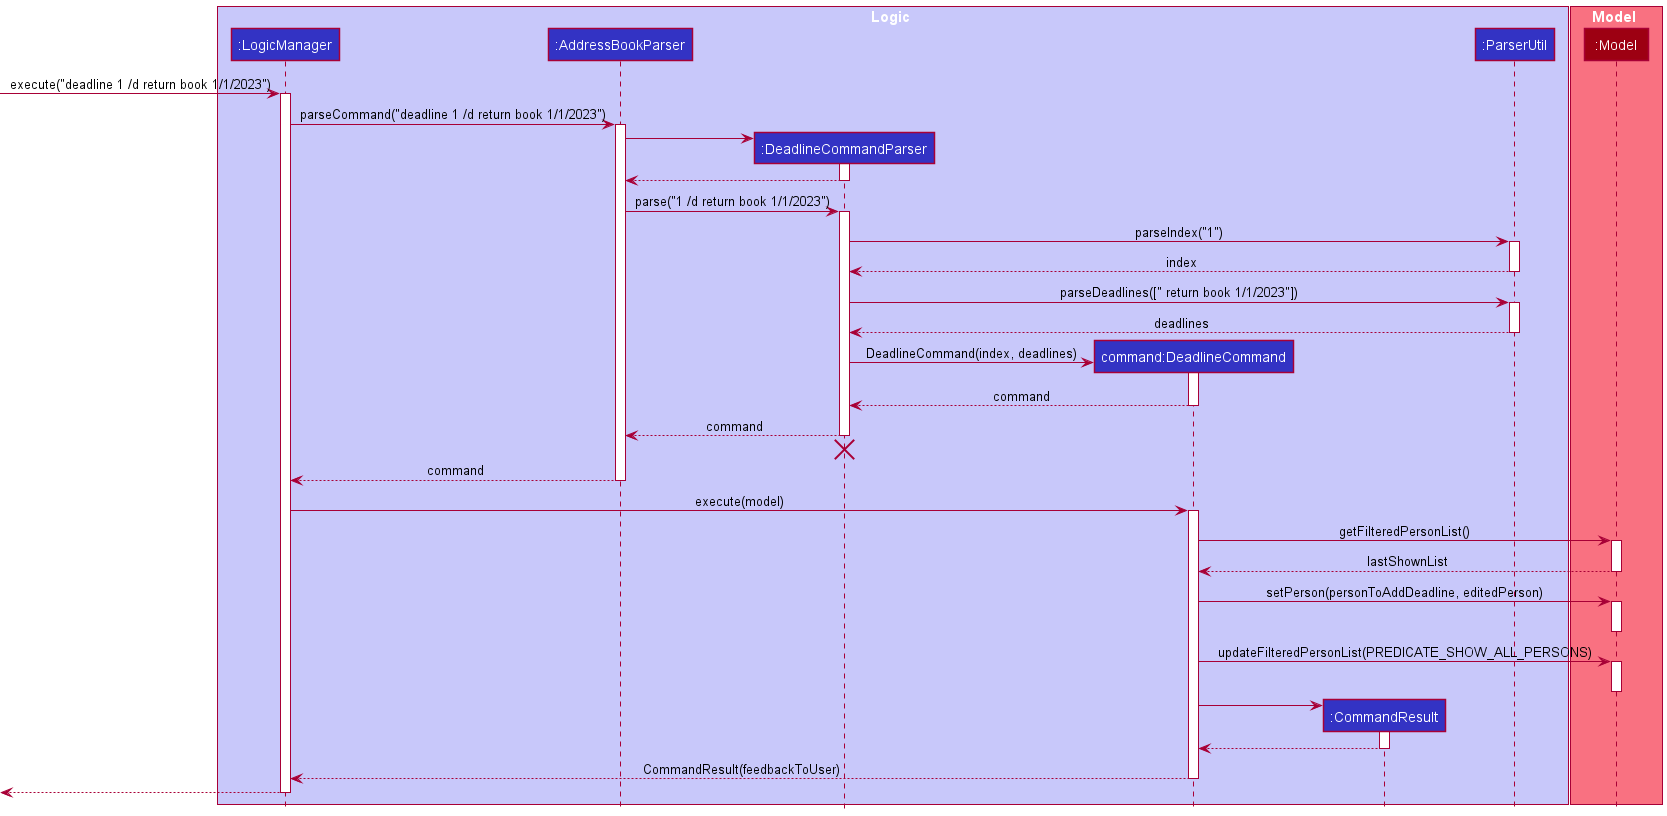
DeadlineCommandParser should end at the destroy marker (X) but due to a limitation of PlantUML, the lifeline reaches the end of diagram
Limitations and proposed solutions
Currently, deadline command allows duplicate deadlines to be added, it will be changed in a later version
Solution: Check DeadlineList before adding deadline.
(more limitations and solutions to be discovered…)
Add contact with address as optional field feature
Implementation
The implemented enhanced add mechanism is facilitated by the add command.
Classes changed for this feature:
AddCommandAddCommandParser
Given below is a code snippet implemented for AddCommandParser:
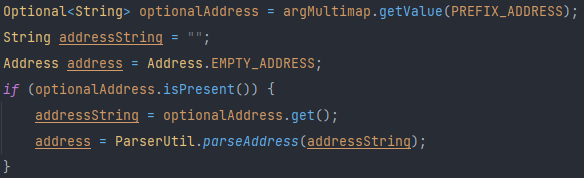
*No Address Specified* is used for Address.EMPTY_ADDRESS instead of an empty string.
Design considerations:
Aspect: Values to accept in address field:
-
Alternative 1 (current choice): Having a string
*No Address Specified*in the address field- Pros: Easy to implement.
- Cons: UI may look less pleasing with repetitive words for each contact.
-
Alternative 2: Accepting empty string in address field
- Pros: UI may look neater and cleaner.
- Cons: Will need to change many components for address field to be an empty string.
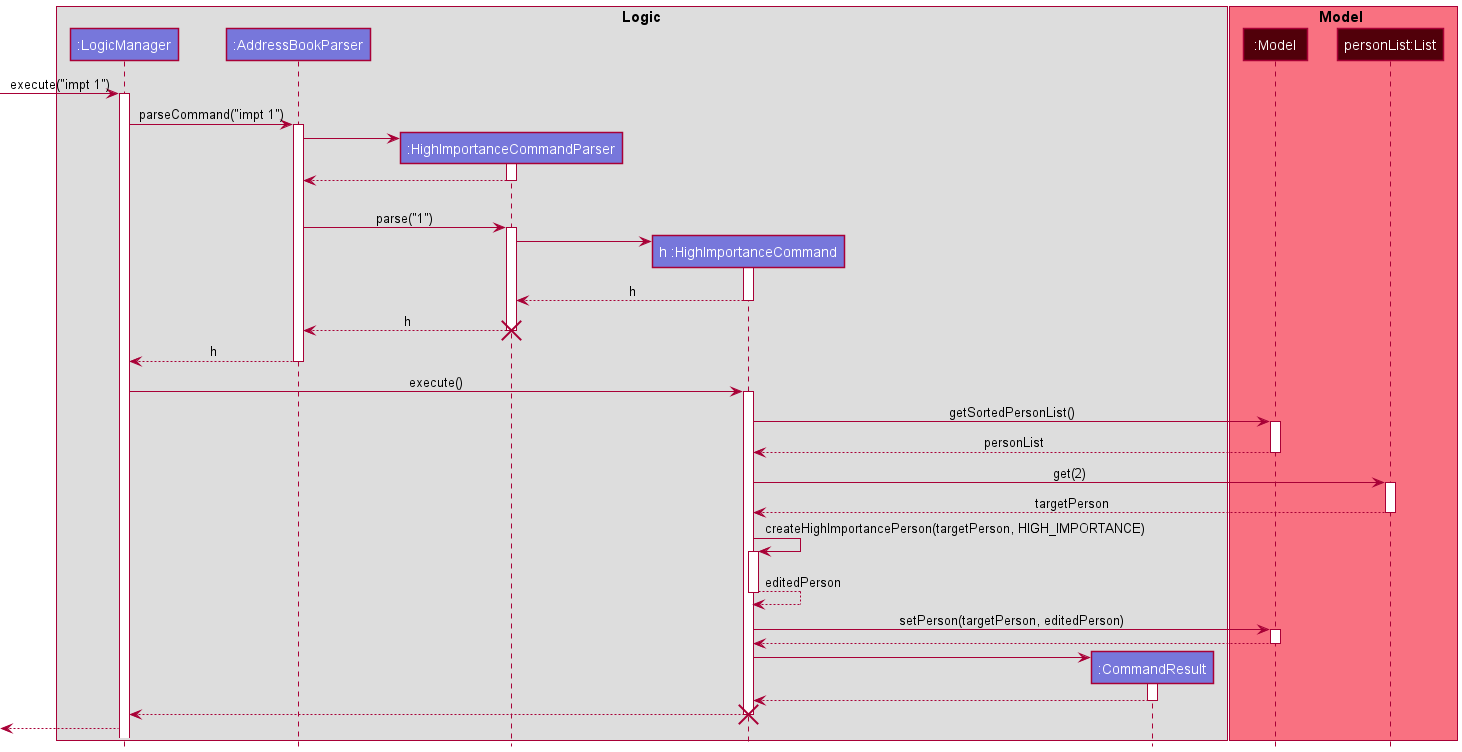
High importance flag feature
Implementation
The implemented high importance flag feature is facilitated by using the execute() method in HighImportanceCommand with the keyword impt to execute the command. This feature is stored as an additional attribute highImportanceStatus for each person within the application and is implemented as a separate class within the Person package.
The highImportanceStatus contains an attribute value which takes on the values of either "true" or "false".
-
"true"denotes that thePersonis a person of high importance. -
"false"denotes that thePersonis a person not of high importance.
Classes added for this feature:
HighImportanceHighImportanceCommandHighImportanceParser
Given below is an example scenario of the high importance flag feature.
Step 1. When a user is created, they are automatically assigned NOT_HIGH_IMPORTANCE as their importance status.
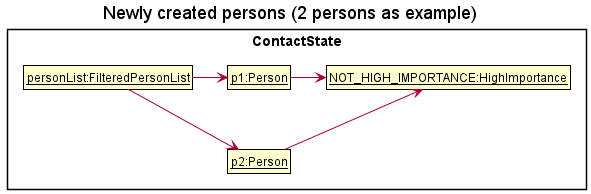
Step 2. The user executes impt 1 command to change the high importance status of the 1st person in the address book. The impt command executes and determines the current highImportanceStatus of the contact (which in this case is NOT_HIGH_IMPORTANCE). It then calls the private helper method createHighImportancePerson to create a copy of the target contact, except with their highImportanceStatus now pointing to the opposite highImportanceStatus value (which will be HIGH_IMPORTANCE).
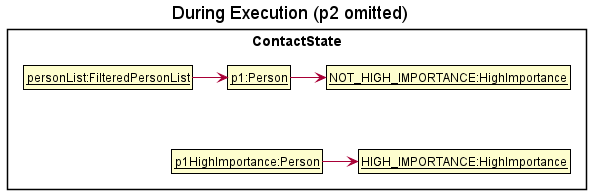
Step 3. The command execution continues on to replace the existing person object with the contact with the newly updated high importance status through Model#setPerson. After the successful execution, the user can visually identify their high importance contacts through the red flag beside their contact names.
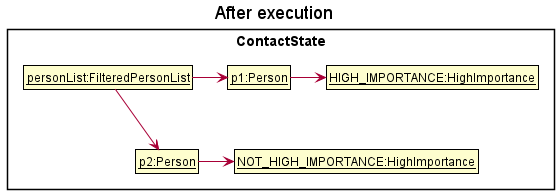
Step 4. The user decides that they want to see only their high importance contacts. The impts command will execute, passing the PersonHasHighImportancePredicate into the Model#updateFilteredPersonList.
The following sequence diagram shows how the feature works:
Design considerations:
Aspect: How important and list important commands execute:
-
Alternative 1 (current choice): Each person responsible for their own high importance state
- Pros:
- Easy to implement.
- Easy to check high importance status of contact.
- Less coupling between
HighImportancecommand and other commands such as edit and delete, as well as the model.
- Cons:
- Adds more fields to the person contact, increasing the complexity of the contact in the long run.
- Need to have a
HighImportanceclass to represent a contact’s status.
- Pros:
-
Alternative 2: Store contacts into a
HighImportancePersonList.- Pros:
- No need to add a field into
Personclass. - No need to have
HighImportanceclass, which acts like a boolean value.
- No need to add a field into
- Cons:
- Have to update the
HighImportancePersonListif a contact of high importance has been modified. - Quite a fair bit of changes requires, especially within the storage.
- Have to update the
- Pros:
Images feature
Implementation
All images added by the user must be associated to some contact. This is done by storing a ImageDetailsList within
the contact’s Person object. The ImageDetailsList encapsulates the information and methods of an iterable list of
ImageDetails. ImageDetails encapsulates the information of images added to the contact, such as the file name
and the filepath of the image.
It is worth noting that ImageDetailsList and ImageDetails do not actually hold the image files, but only the
file and path names. This means that an ImageDetails object could exist for a non-existent image file. This is resolved
by using the ImageUtil helper class’ methods.
Apart from the ImageDetailsList and ImageDetails, the ImageUtil helper class can be seen as the bridge between
the ImageDetails object and the actual directory/image file. It contains methods to check the existence of files at
a specified filepath, copying an image into a directory, and sanitizing ImageDetailLists (removing ImageDetails
objects from the list which do not have an existing image in the specified filepath).
Users first interact with images by adding them to a specific contact through the AddImagesCommand. It leverages
on the JFileChooser class provided by JavaFX. This is the interface that users will encounter when trying to
select image(s) to add into the application. Note that only .jpg and .png files are allowed by default, and there
is no existing way for the user to customize it.
The ImagesCommand will identify the contact whose images are of interest to the user, based on the given index.
The Logic will then pass the ImageDetailsList of this Person into the ImagesToView field of the Model.
It will return a SpecialCommandResult which is VIEW_IMAGES, and the UI will then push the user to the ViewImagesPanel,
where the images stored in the ImagesToView field will be shown to the user.
The user can delete images by running the DeleteImageCommand, with parameters: 1. The index of the contact whose images
are to be deleted, 2. The index of the image belonging to the contact. The logic will then identify the person and the
image of choice. It will remove the ImageDetails object from the Person’s ImageDetailsList, and delete the
image associated with it.
Given below is an example scenario of the add images feature in operation
Step 1. When a user types addimg INDEX, Logic looks for the specified person at INDEX based on SortedPersonList.
Step 2. Logic will then open the JFileChooser interface for the user to select any amount of images they wish to
add into the selected contact.
Step 3. After selecting the image(s), they will be copied through the help of the ImageUtil class, which leverages on the
ImageIO class provided by the javax imageio library, into the specified contact_images_path specified in the
UserPrefs. By default, this is /data/images/ directory.
Step 4. Each of these newly copied images will have their filepaths stored into their own newly created ImageDetails objects.
The existing images of the contact, if any, will be added together with the new ImageDetails into a new ImageDetailsList
Step 5. The ImageDetailsList will be added to the Person object.
Design considerations
Aspect: How the images should be saved
- Alternative 1 (current choice): Image details associated with a contact is stored directly as a
Person’s field.- Pros: Easier to search for a contact’s images, as we only have to search for the given contact.
- Cons: Not necessarily part of a contact’s personal information. Eventually starts to bloat up the
Personclass.
- Alternative 2: Image details are stored in a list in the
Model.- Pros: Easier to maintain/sanitize the list of images for outdated/corrupted images.
- Cons: Hard to associate the images with the persons, since there is no unique identifying number/value associated
with
Person.
Adding features to Model
Find tag feature
Implementation
The find tag feature is used when a user is interested in finding contacts who have a certain Tag. Each Person has a set of Tags which contains unique Tags since each Person should not have more than 1 of the same tag.
This feature is facilitated by FindTagCommand, which makes use of a List of keywords that the TagContainsKeywordPredicate uses to checks if the Tag set of a Person contains all the tag names in the current ActivatedTagList which contains all selected keywords used as filter (case-insensitive).
Each use of the find tag feature adds the given keyword(s) into the ActivatedTagList that serves as a filter for selected tags. The keywords in the ActivatedTagList are then used to create the TagContainsKeywordPredicate to check the Tag set of each Person. The keywords in the ActivatedTagList is only cleared when list command is called.
The FindTagCommand#execute() method looks through the Tag set of each Person and updates the Model#filteredPersons using Model#updateFilteredPersonsList() which uses the TagContainsKeywordPredicate. The Model then displays the currently most updated filtered person list which reflects contacts with the specified tags in the list.
As such, FindTagCommand extends Command and executes the command by calling FindTagCommand#execute().
findtag friends colleagues, then the contact should have both tags friends and colleagues in order for the contact to be reflected on the updated filtered person list.
Given below is an example usage scenario and how the find tag feature behaves at each step.
Step 1. The user launches the address book for the first time, initialized with the initial address book state.
Step 2. The user executes the command findtag friends to find contacts with the tag friends in their set of tags.
Step 3. The AddressBookParser parses the command findtag friends and creates a FindTagCommandParser to parse the keyword friends.
Step 4. The FindTagCommand object is created with the given keyword friends as a Singleton List.
Step 5. The current tag names in the ActivatedTagList are then retrieved, creating a new TagContainsKeywordPredicate.
Step 6. The LogicManager then calls FindTagCommand#execute(), calling Model#updateFilteredPersonList() which updates the list of persons to be displayed.
Step 7. The CommandResult created from FindTagCommand#execute() is returned to the LogicManager which will be reflected in the ResultDisplay of the GUI.
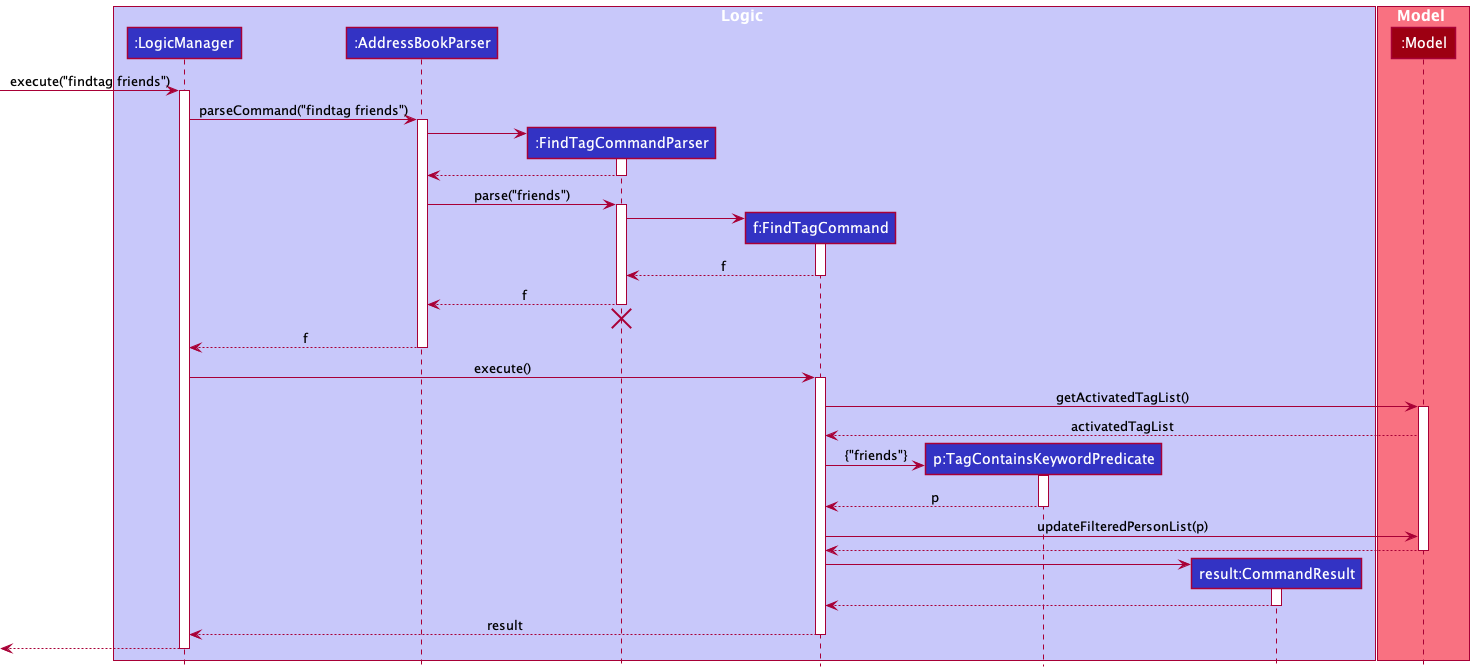
FindTagCommandParser should end at the destroy marker (X) but due to a limitation of PlantUML, the lifeline reaches the end of diagram.
Design considerations:
Aspect: Should contacts have all the keywords searched for:
-
Alternative 1 (current choice): Contacts containing strictly the same tags as all the keywords searched for.
- Pros: More intuitive, as only contacts with strictly the same tags as all the keywords searched will be listed.
- Cons: Have to ensure the contacts are tagged correctly, or they will not be found with this feature.
-
Alternative 2: Contacts containing any tags of the keywords searched for.
- Pros: Can find contacts who have any tags the keywords searched.
- Cons: Unintuitive, as we usually narrow down the scope for filtering.
Assimilating new UI components
Contact view feature
The detailed contact view feature is a new component added to the UI. The detailed view would replace the list of contacts when it is requested. While in this view, commands to edit the contact no longer need to specify an index, since it is implied that the contact to edit is the one being displayed. Thus, implementing the feature required resolving the following two challenges:
- How to tell the UI whether to show the list panel or the detailed view panel.
- How to support alternative command formats for modifying the contact in detailed view
Implementation
The first challenge is particularly complex, as switching between panel views is done through commands, which are
executed by Logic, and modify Model. In the current design, commands are not aware of UI.
However, the MainWindow class does have some responsibilities to fulfill in the process of command execution. It
handles the special cases where the command is either ExitCommand or HelpCommand, and closes the main window or
displays the help window respectively. Building upon this behaviour, the CommandResult, produced by every Command
after its execution, can be responsible for signalling to the MainWindow to change view. The main draw of this
implementation is that MainWindow continues to solely handle UI-related responsibilities, while Command will handle
the logic of what should be displayed, hence preserving the Single-Responsibility Principle.
For the second challenge, since the MainWindow knows which panel it is displaying, the LogicManager can be
informed to parse the command differently.
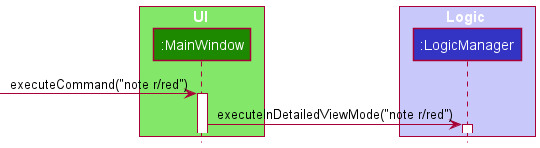
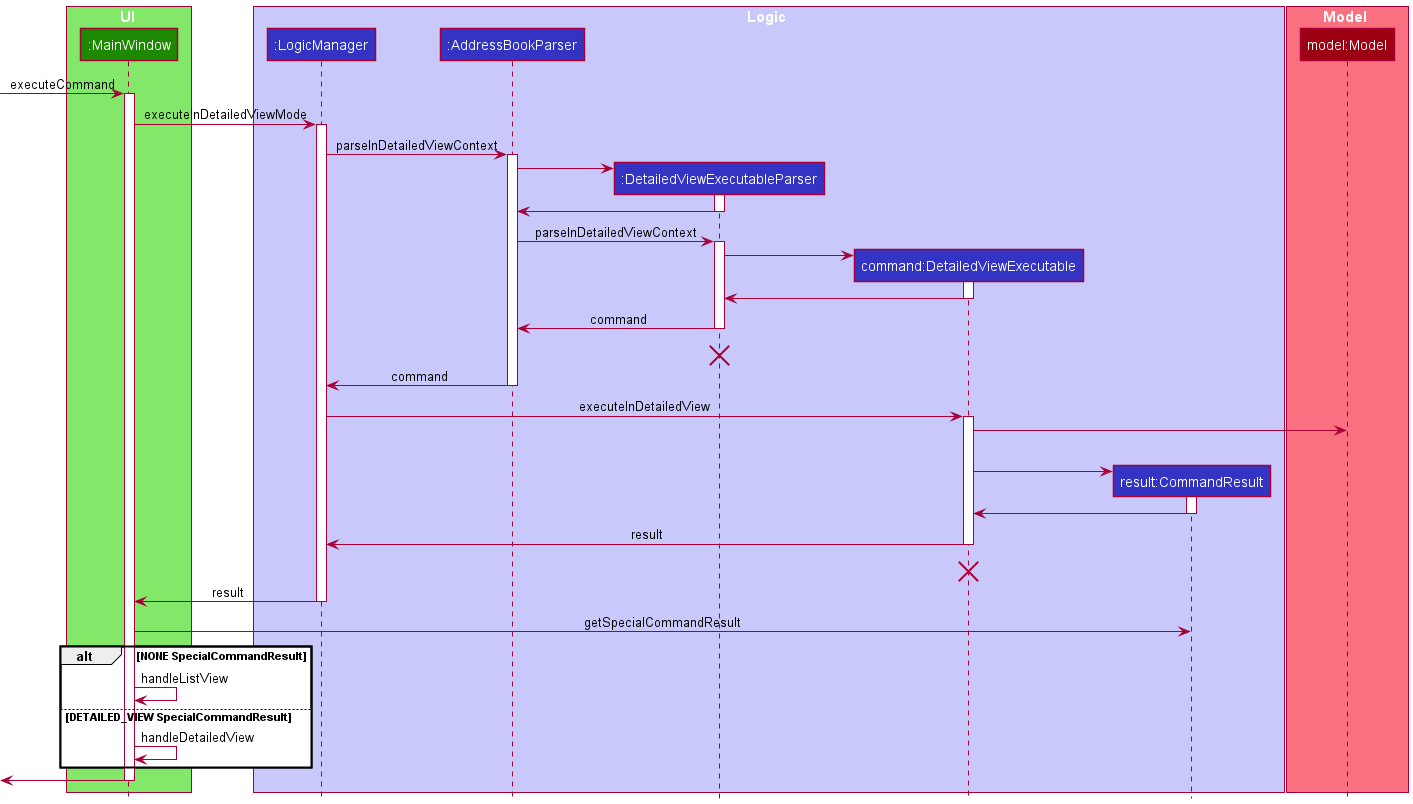
To illustrate the behaviour of the implementation, let’s examine the process where the user passes
note r/red, while the MainWindow is displaying the detailed contact view.
Step 1. The user gives the command note r/red. MainWindow realises it is in detailed view, and calls
LogicManager::executeInDetailedViewMode.
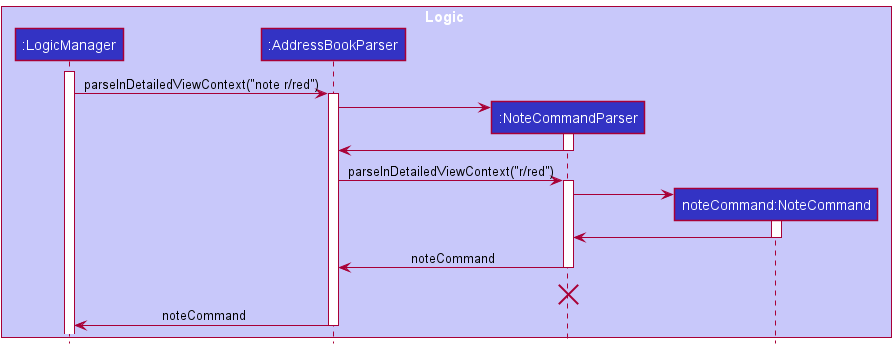
Step 2. LogicManager calls AddressBookParser::parseInDetailedViewContext to parse the user input in a different
way. The method returns a NoteCommand, which is a DetailedViewExecutable. Note that NoteCommandParser
successfully parsed a NoteCommand without an index.
Step 3. LogicManager calls NoteCommand::executeInDetailedView. NoteCommand executes a slightly different logic,
as it can get personToEdit from model::getDetailedContactViewPerson. It replaces personToEdit in both the person
list as well as in the detailed contact view. Finally, the CommandResult produced has the field
SpecialCommandResult.DETAILED_VIEW, and is returned to LogicManager.
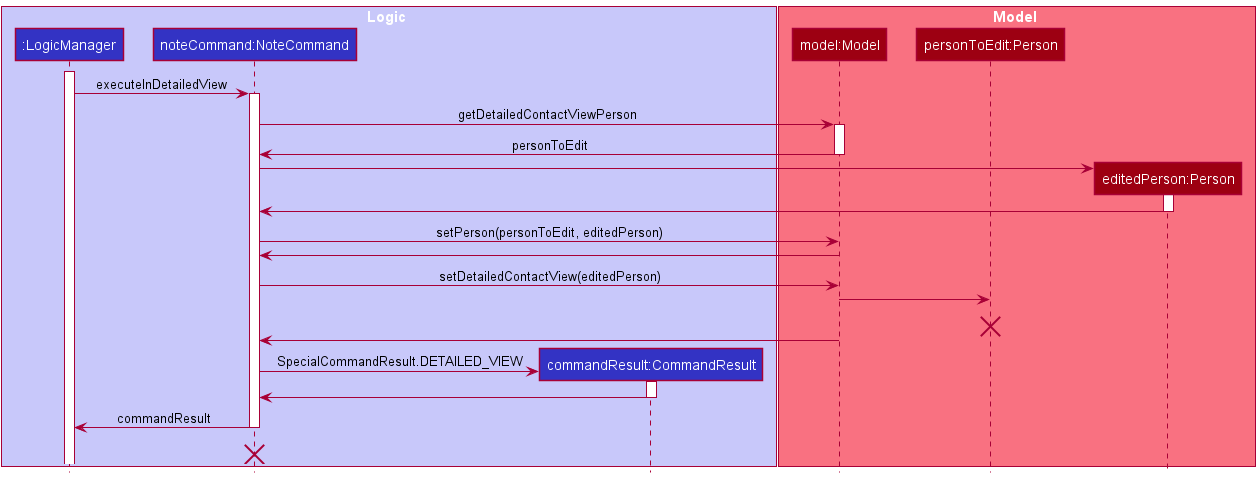
Step 4. LogicManager returns the same CommandResult to MainWindow. MainWindow checks and finds that it has
to call its handleDetailedView method. It continues to show the detailed view panel.
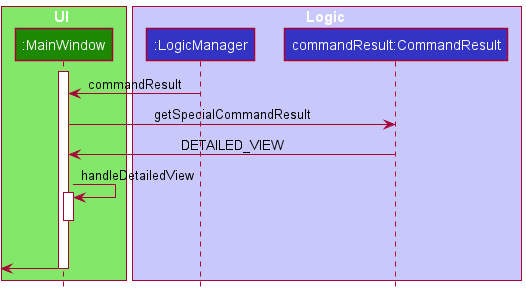
To summarise, here is a generalised sequence diagram for a command execution in detailed view mode, with some details omitted.
Design Considerations
To support this implementation, on top of the Command design pattern that was in place, the DetailedViewExecutable
interface was added to enforce which commands can run in detailed view mode. This implementation does not preserve the
Command design pattern. Notice that commands have to implement two separate kinds of execute method, when the ideal
case is that commands are simply executed by LogicManager, without having to intently call two different kinds of
execute.
This can be resolved by having an intermediate abstract class DetailedViewExecutableCommand, that extends Command
and is inherited by concrete Command classes. LogicManager will parse for a DetailedViewExecutableCommand, and
call its execute method.
However, there are also cons for such a method. The following table gives some comparisons.
| Aspect | Interface forcing additional execute methods (current choice) |
Abstract Class allowing singular execute method |
|---|---|---|
| Effort to change | More lines of code required implementing multiple methods with some repetition | Less lines of code as some code is common between different execution and can be placed in one method |
| Extensibility | Easy to extend to include more types of command using a new interface and implementing a new method | Difficult to extend as adding existing commands to a new type requires rewriting existing code and regression testing |
| Simplicity | Easy to reason as command execution is isolated to each method and depends on which is called | Difficult to reason as command execution depends on potentially many external factors |
However, one area that both implementations can improve is interacting with Model. Due to the pre-existing requirements,
commands only needed Index as a way to retrieve a Person object from Model. For commands running in detailed view
mode, this Index was not required, but retrieving a Person explicitly called getDetailedContactViewPerson of the
ModelManager.
A more ideal solution is for commands to have an Identifier field, which can retrieve a Person from a Model. The
Identifier can be an Index, which will be a superclass, or a different superclass that will retrieve the Person
in detailed view. Do note that Index is a utility class for indexing and is used in places other than identifying
Person in the contact list. You should implement a different class to behave like an index for this usage so as to
preserve Single Responsibility Principle.
This feature has potential to be even more useful. If commands are enhanced to support operating on multiple Person
at once, a new Identifier can be implemented to support this, thus changes to commands will be minimal.
Enhancing data storage
[Proposed] Undo/redo feature
Proposed Implementation
The proposed undo/redo mechanism is facilitated by VersionedAddressBook. It extends AddressBook with an undo/redo history, stored internally as an addressBookStateList and currentStatePointer. Additionally, it implements the following operations:
-
VersionedAddressBook#commit()— Saves the current address book state in its history. -
VersionedAddressBook#undo()— Restores the previous address book state from its history. -
VersionedAddressBook#redo()— Restores a previously undone address book state from its history.
These operations are exposed in the Model interface as Model#commitAddressBook(), Model#undoAddressBook() and Model#redoAddressBook() respectively.
Given below is an example usage scenario and how the undo/redo mechanism behaves at each step.
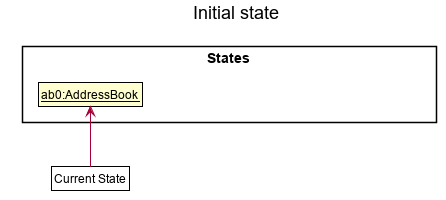
Step 1. The user launches the application for the first time. The VersionedAddressBook will be initialized with the initial address book state, and the currentStatePointer pointing to that single address book state.
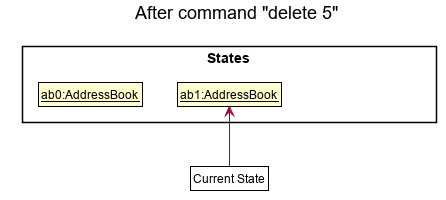
Step 2. The user executes delete 5 command to delete the 5th person in the address book. The delete command calls Model#commitAddressBook(), causing the modified state of the address book after the delete 5 command executes to be saved in the addressBookStateList, and the currentStatePointer is shifted to the newly inserted address book state.
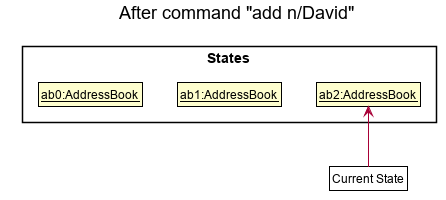
Step 3. The user executes add n/David … to add a new person. The add command also calls Model#commitAddressBook(), causing another modified address book state to be saved into the addressBookStateList.
Model#commitAddressBook(), so the address book state will not be saved into the addressBookStateList.
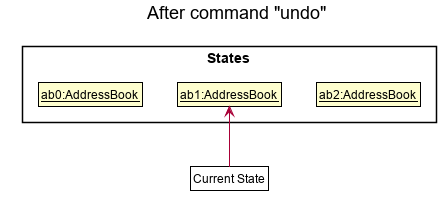
Step 4. The user now decides that adding the person was a mistake, and decides to undo that action by executing the undo command. The undo command will call Model#undoAddressBook(), which will shift the currentStatePointer once to the left, pointing it to the previous address book state, and restores the address book to that state.
currentStatePointer is at index 0, pointing to the initial AddressBook state, then there are no previous AddressBook states to restore. The undo command uses Model#canUndoAddressBook() to check if this is the case. If so, it will return an error to the user rather
than attempting to perform the undo.
The following sequence diagram shows how the undo operation works:
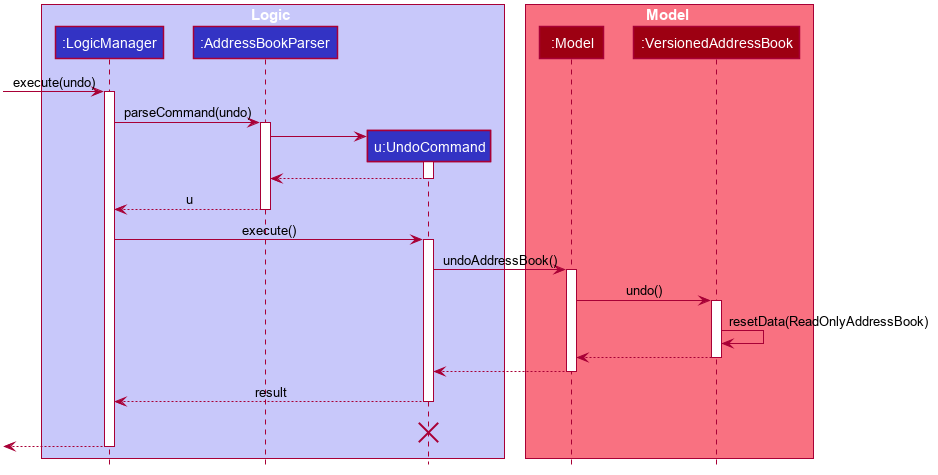
UndoCommand should end at the destroy marker (X) but due to a limitation of PlantUML, the lifeline reaches the end of diagram.
The redo command does the opposite — it calls Model#redoAddressBook(), which shifts the currentStatePointer once to the right, pointing to the previously undone state, and restores the address book to that state.
currentStatePointer is at index addressBookStateList.size() - 1, pointing to the latest address book state, then there are no undone AddressBook states to restore. The redo command uses Model#canRedoAddressBook() to check if this is the case. If so, it will return an error to the user rather than attempting to perform the redo.
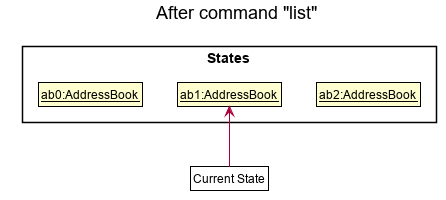
Step 5. The user then decides to execute the command list. Commands that do not modify the address book, such as list, will usually not call Model#commitAddressBook(), Model#undoAddressBook() or Model#redoAddressBook(). Thus, the addressBookStateList remains unchanged.
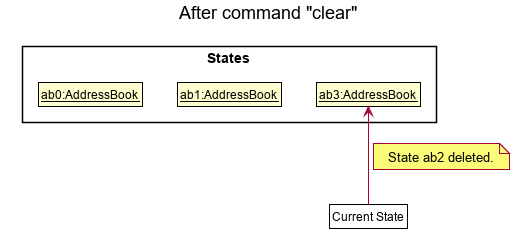
Step 6. The user executes clear, which calls Model#commitAddressBook(). Since the currentStatePointer is not pointing at the end of the addressBookStateList, all address book states after the currentStatePointer will be purged. Reason: It no longer makes sense to redo the add n/David … command. This is the behavior that most modern desktop applications follow.
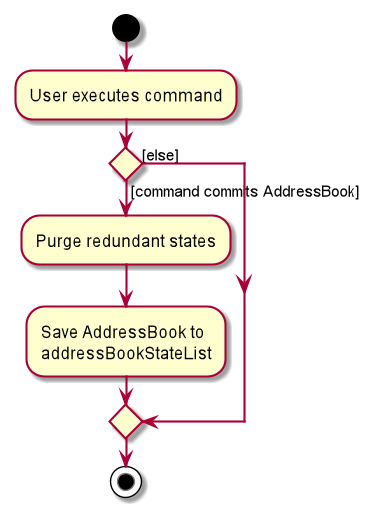
The following activity diagram summarizes what happens when a user executes a new command:
Design considerations:
Aspect: How undo & redo executes:
-
Alternative 1 (current choice): Saves the entire address book.
- Pros: Easy to implement.
- Cons: May have performance issues in terms of memory usage.
-
Alternative 2: Individual command knows how to undo/redo by
itself.
- Pros: Will use less memory (e.g. for
delete, just save the person being deleted). - Cons: We must ensure that the implementation of each individual command are correct.
- Pros: Will use less memory (e.g. for
Documentation, logging, testing, configuration, dev-ops
Appendix: Requirements
Product scope
Target user profile:
d’Intérieur is designed for interior designers who:
- Have a preference for CLI apps
- have many clients and projects to keep track of
- can type fast
- prefer typing to mouse interactions
Value proposition: organise information on client and projects, giving a one-stop overview of current work progress and schedule.
User stories
Priorities: High (must have) - * * *, Medium (nice to have) - * *, Low (unlikely to have) - *
| Priority | As a … | I want to … | So that I can… |
|---|---|---|---|
* * * |
new user | look at a basic tutorial for adding contacts | understand what details I can add to a contact |
* * * |
busy interior designer | add a new contact quickly | reduce time on adding new contacts |
* * * |
user | delete a contact | remove entries that I no longer need |
* * * |
user | find a contact by name | locate details of contacts without having to go through the entire list |
* * * |
interior designer | label my contacts with some fixed labels | categorise my clients based on the stage of design I am at |
* * * |
interior designer with many ongoing leads | filter my contacts list based on label | easily keep track of who I am working with at a specific point of time without having to remember |
* * * |
interior designer | add notes under a contact | keep track of the demands and requirements of each individual project |
* * * |
busy interior designer | add a deadline under a contact | keep track of my deadlines easily |
* * * |
user | favourite certain contacts | look up favourites and contact them easily |
* * * |
interior designer | add images under a client | keep track of images such as floor plans and inspirational designs relevant to the client |
* * |
interior designer | check upcoming deadlines in chronological order | keep track of deadlines automatically |
* * |
long-time user | separate past and current clients | avoid contacting clients with similar names or old clients that I am not presently working with |
* * |
new user | view a list of commands | know what commands are available and the right commands to use |
* * |
interior designer | add a high importance flag to a client | take note of pressing issues regarding a client, such as mobility issues |
* |
interior designer | track and calculate costs accumulated for a client | at a glance, know how much money has been spent on them for a project |
* |
interior designer | generate invoices | easily generate, store and print invoices for my clients |
* |
interior designer | send out automated messages/emails to clients to wish them well on festive occasions | maintain good rapport with clients |
* |
user | create contacts by importing information from other apps | create contacts more easily |
Use cases
(For all use cases below, the System is d'Intérieur and the Actor is the user, unless specified otherwise)
UC01: Add a contact
MSS
- User adds a person with the required fields.
- d’Intérieur shows the new contact added with the details entered.
Use case ends.
Extensions
-
1a. User includes address field.
- Use case resumes at step 2.
UC02: Delete a contact
MSS
- User requests to list contacts.
- d’Intérieur shows a list of contacts.
- User requests to delete a specific contact in the list.
- d’Intérieur shows contact deleted and updates the list.
Use case ends.
Extensions
-
2a. The list is empty.
Use case ends.
-
3a. The given index is invalid.
-
3a1. d’Intérieur shows an error message.
Use case resumes at step 2.
-
UC03: Add a label to a contact
MSS
- User requests to list contacts.
- d’Intérieur shows a list of contacts.
- User requests to add a label to a specific contact in the list.
- d’Intérieur adds the label to the contact and shows the contact.
Use case ends.
Extensions
-
2a. The list is empty.
Use case ends.
-
3a. The given index is invalid.
-
3a1. d’Intérieur shows an error message.
Use case resumes at step 2.
-
-
3b. The label requested does not currently exist in d’Intérieur.
-
3b1. Add a label to d’Intérieur (UC08)
Use case ends.
-
UC04: Filter contacts using labels
MSS
- User requests list of contacts filtered to those containing the given label.
- d’Intérieur shows a list of contacts who have the given label.
Use case ends.
Extensions
-
1a. The given label does not exist.
-
Add a label to d’Intérieur (UC08)
Use case ends.
-
UC05: Adding a note to a contact
MSS
- User requests to add a note to a specific contact in the list.
- d’Intérieur adds the note to the contact and shows the contact.
Use case ends.
Extensions
-
1a. User enters only whitespaces or nothing as a note.
-
1a1. d’Intérieur alerts the user that no changes have been made to notes
Use case ends.
-
-
1b. The given index is invalid.
-
1b1. d’Intérieur shows an error message.
Use case resumes at step 1.
-
UC06: Adding a contact to favourites
MSS
- User requests to add a specific contact in the list to favourites.
- d’Intérieur adds the contact to favourites and shows the contact.
Use case ends.
Extensions
-
1a. The given index is invalid.
-
1a1. d’Intérieur shows an error message.
Use case resumes at step 1.
-
UC07: Add a deadline
- User requests to add a deadline under a contact.
- d’Intérieur adds the deadline under the contact and shows the contact.
Use case ends.
Extensions
-
1a. The deadline given does not contain a valid date or time.
-
1a1. d’Intérieur shows an error message.
Use case ends
-
-
1b. The given index is invalid.
-
1b1. d’Intérieur shows an error message.
Use case ends.
-
UC08: Add a label to d’Intérieur
MSS
- User requests to create a label to label contacts in the contact list.
- d’Intérieur adds the label to the contact list.
Use case ends.
Extensions
-
1a. User enters non-alphanumeric name or nothing as the name for the label.
-
1a1. d’Intérieur alerts the user that the given name is invalid.
Use case ends.
-
UC09: Deleting a label in d’Intérieur
MSS
- User requests to delete one or more labels in the contact list.
- d’Intérieur deletes the given labels and unassign (UC10) the labels from every contact.
Use case ends.
Extensions
-
1a. User enters all labels that do not exist.
-
1a1. d’Intérieur alerts the user that the given labels do not exist.
Use case ends.
-
-
1b. Users enter some labels that do not exist.
-
1b1. d’Intérieur alerts the user that only some labels will be deleted.
Use case resumes at step 2.
-
UC10: Unassign a label from a contact
MSS
- User requests to unassign a label from a specified contact.
- d’Intérieur removes the given label from the specified contact.
Use case ends.
Extensions
-
1a. The given label does not exist.
-
Add a label to d’Intérieur (UC08)
Use case ends.
-
UC11: Updating contact information in detailed view
MSS
- User requests to view a contact’s full information.
- d’Intérieur shows the contact’s full information.
- User edits the contact’s information.
- d’Intérieur updates the contact’s information and displays it.
Steps 3 and 4 repeats until the user has updated the contact as they have needed. - User requests to list contacts.
- d’Intérieur shows the list of contacts
Use case ends.
UC12: Adding an image to a contact
MSS
- User requests to add image(s) to a contact.
- d’Intérieur adds the images to the given contact.
- d’Intérieur shows the newly added images in the images view.
Use case ends.
Extensions
-
1a. User closes the interface without selecting any image(s).
-
1a1. d’Intérieur alerts the user that no images have been added.
Use case ends.
-
UC13: Deleting an image from a contact
MSS
- User requests to delete an image from a contact.
- d’Intérieur removes the image from the contact.
Use case ends.
UC14: Listing all images of a contact
MSS
- User requests to view all images of a contact.
- d’Intérieur lists all their image(s) in the images view panel.
Use case ends.
Non-Functional Requirements
- Should work on any mainstream OS as long as it has Java
11or above installed. - Should be able to hold up to 1000 contacts without a noticeable sluggishness in performance for typical usage.
- A user with above average typing speed for regular English text (i.e. not code, not system admin commands) should be able to accomplish most of the tasks faster using commands than using the mouse.
- Should work on both 32-bit and 64-bit environments.
- The system should boot up within five seconds.
- The system is not required to handle a non-text input.
- The system should be able to have up to 5000 contacts.
- The response to any action should become visible within five seconds.
Glossary
- User and Interior Designer: Both are used interchangeably as d’Intérieur is enhanced for interior designers
- Contact: An entry in the d’Intérieur app
- Client: A specific type of contact that interior designers will most likely keep track of
- Mainstream OS: Windows, Linux, Unix, OS-X
- Private contact detail: A contact detail that is not meant to be shared with others
Appendix: Instructions for manual testing
Given below are instructions to test the app manually.
Launch and shutdown
-
Initial launch
-
Download the jar file and copy into an empty folder
-
Double-click the jar file Expected: Shows the GUI with a set of sample contacts. The window size may not be optimum.
-
-
Saving window preferences
-
Resize the window to an optimum size. Move the window to a different location. Close the window.
-
Re-launch the app by double-clicking the jar file.
Expected: The most recent window size and location is retained.
-
Deleting a person
-
Deleting a person while all persons are being shown
-
Prerequisites: List all persons using the
listcommand. Multiple persons in the list. -
Test case:
delete 1
Expected: First contact is deleted from the list. Details of the deleted contact shown in the status message. Timestamp in the status bar is updated. -
Test case:
delete 0
Expected: No person is deleted. Error details shown in the status message. Status bar remains the same. -
Other incorrect delete commands to try:
delete,delete x,...(where x is larger than the list size)
Expected: Similar to previous.
-
Commands in detailed view
Refer to the command summary table in the User Guide for all the valid commands to test.
-
Commands that work in both list view and detailed view
-
Prerequisite: Use
viewon a contact. -
Test case:
note r/Likes dark wood
Expected: NoteLikes dark woodis added to the contact’s list of notes. -
Test case:
note 2 r/Likes dark wood
Expected: Same outcome as above test case where no index is specified -
Test case:
note Likes dark wood
Expected: No note added. Error details shown. -
Repeat above three test cases for other commands, using the correct detailed view command format, followed by the list view command format, and lastly erroneous command formats, if any.
-
-
Commands that do not work in detailed view
-
Prerequisite: Use
viewon a contact. -
Test case:
clear
Expected: Error message shown, usinglistwill show that the list of contacts were not cleared. -
Repeat the test for other commands that do not work in detailed view.
-
Creating a tag
-
Creating a tag after clearing sample data
-
Test case:
tag Friends
Expected: Friends tag is created. -
Test case:
tag Friends & Colleagues
Expected: No tag is created. Error details shown in the status message. -
Other incorrect commands to try:
tag,tag _,tag -1,tag foo Bar,tag TAGNAME,...(where TAGNAME is non-alphanumeric)
Expected: Similar to previous.
-